
If you've already committed to buying a ROG Xbox Ally or ROG Xbox Ally X, or you're thinking about picking one up in the near future, we think there are a few things you need to know in order to get the best day one experience possible!
I've been spending basically all of October with the "X" version so far, and there are definitely some tips and tricks to be aware of - after all, this is a PC handheld and it functions very differently to an Xbox Series X or Xbox Series S.
So, let's take a look at 10 tips and tracks to help you navigate your first day with the ROG Xbox Ally:
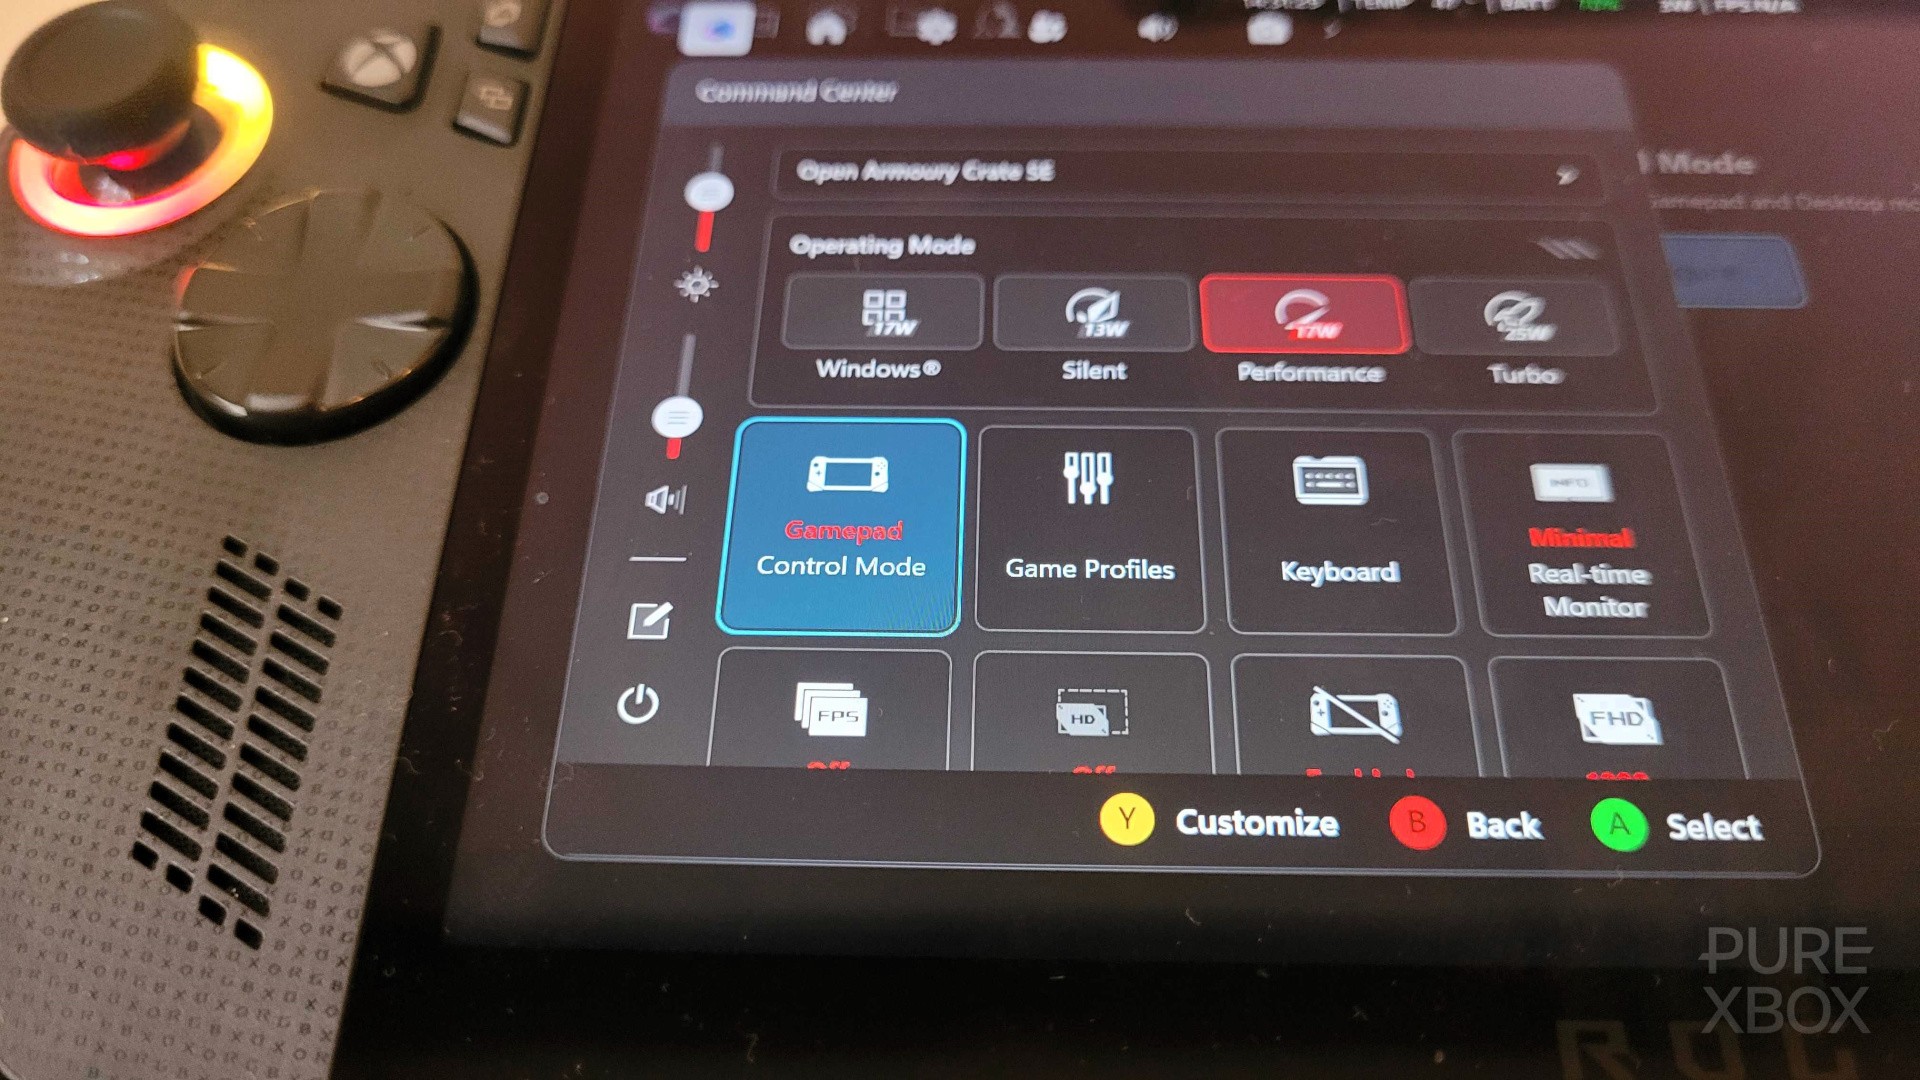
1. Try and stick to the "Performance" (17w) operating mode where possible
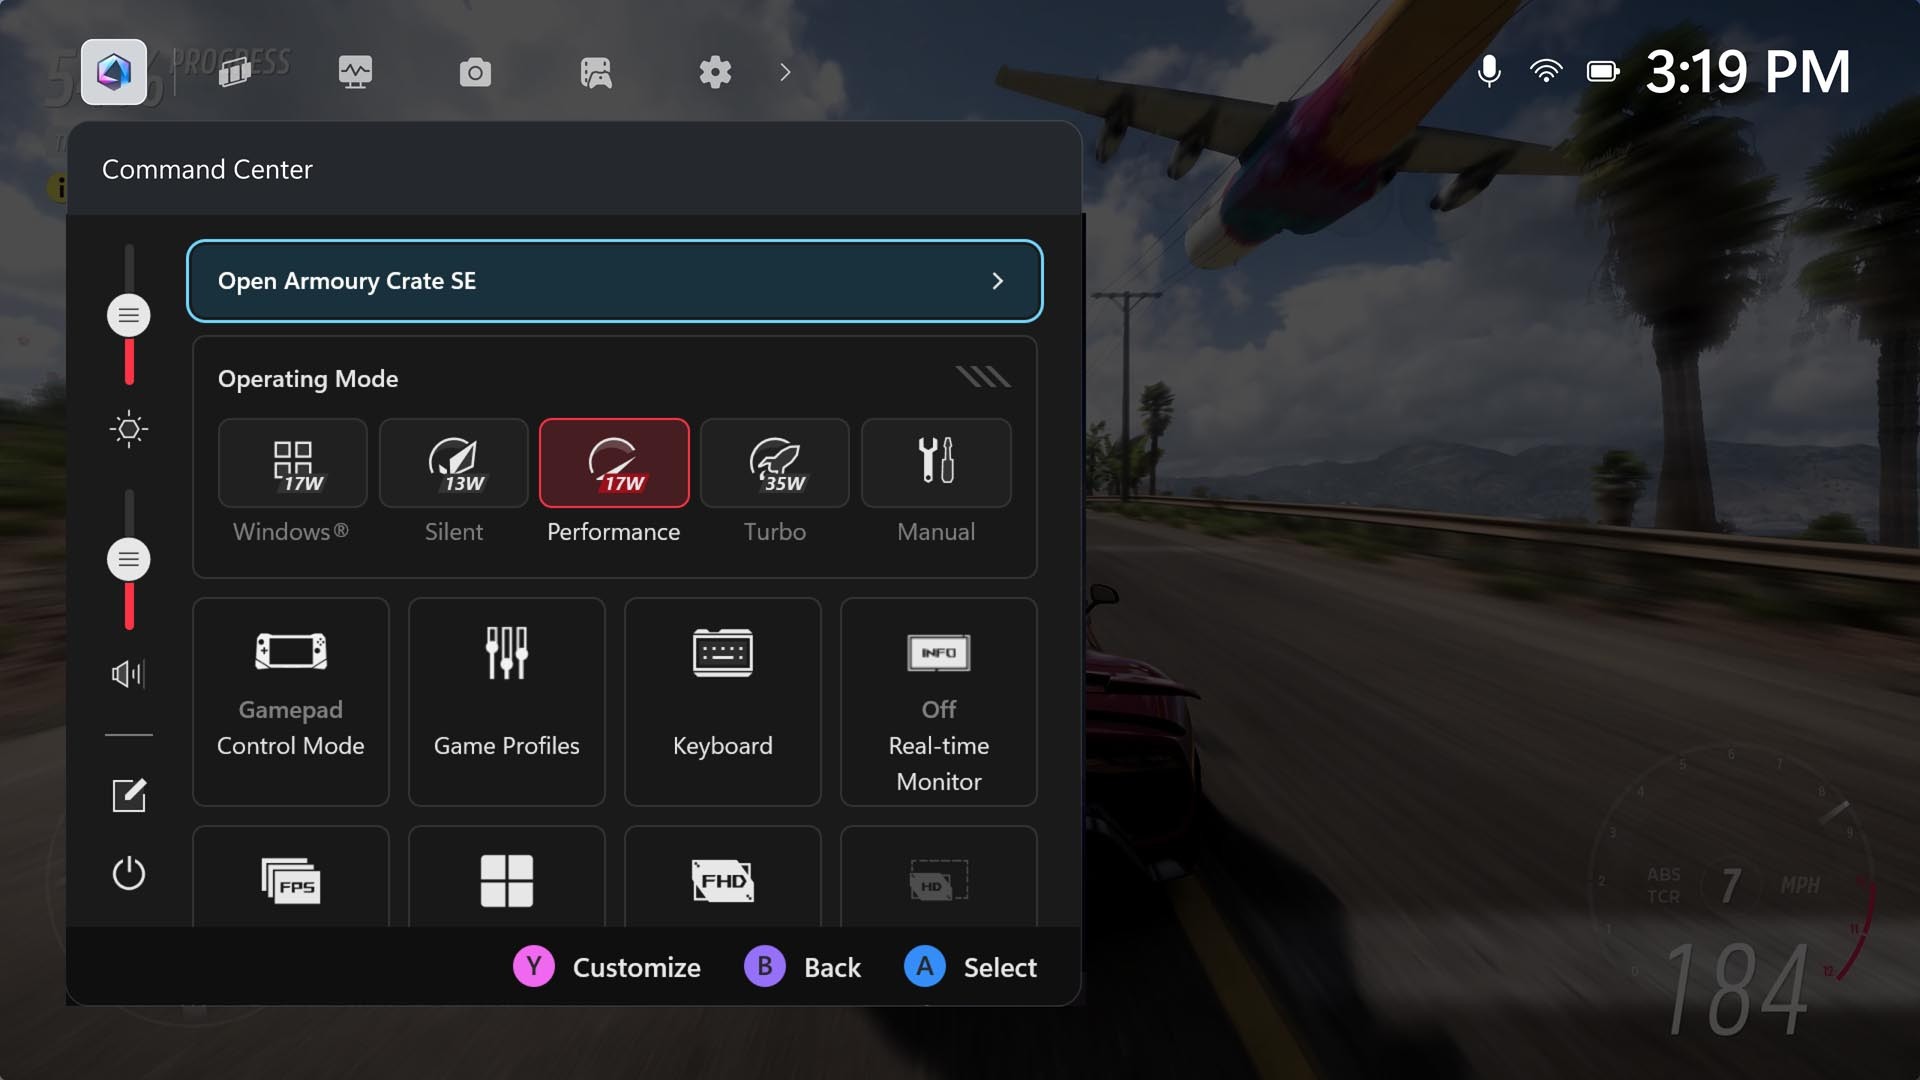
You've got three "operating modes" to choose from on the ROG Xbox Ally - "Silent", "Performance" and "Turbo". The higher you go, the more juice you'll be able to get out of your system, but the trade-off is a more rapid loss of battery life and fans that'll ramp up and get a little louder.
Based on what I've been playing so far, "Performance" definitely feels like the sweet spot. You can still reach 60FPS and above in plenty of AAA titles using this mode (albeit with potentially worse in-game graphics settings), so I personally think this should be your go-to for most games - only move up to "Turbo" if you really need to, or if you're playing with the charger plugged in. Of course, for many indie games, you can go even lower and choose "Silent" instead!
2. Customise your power button to go into "Hibernate" mode
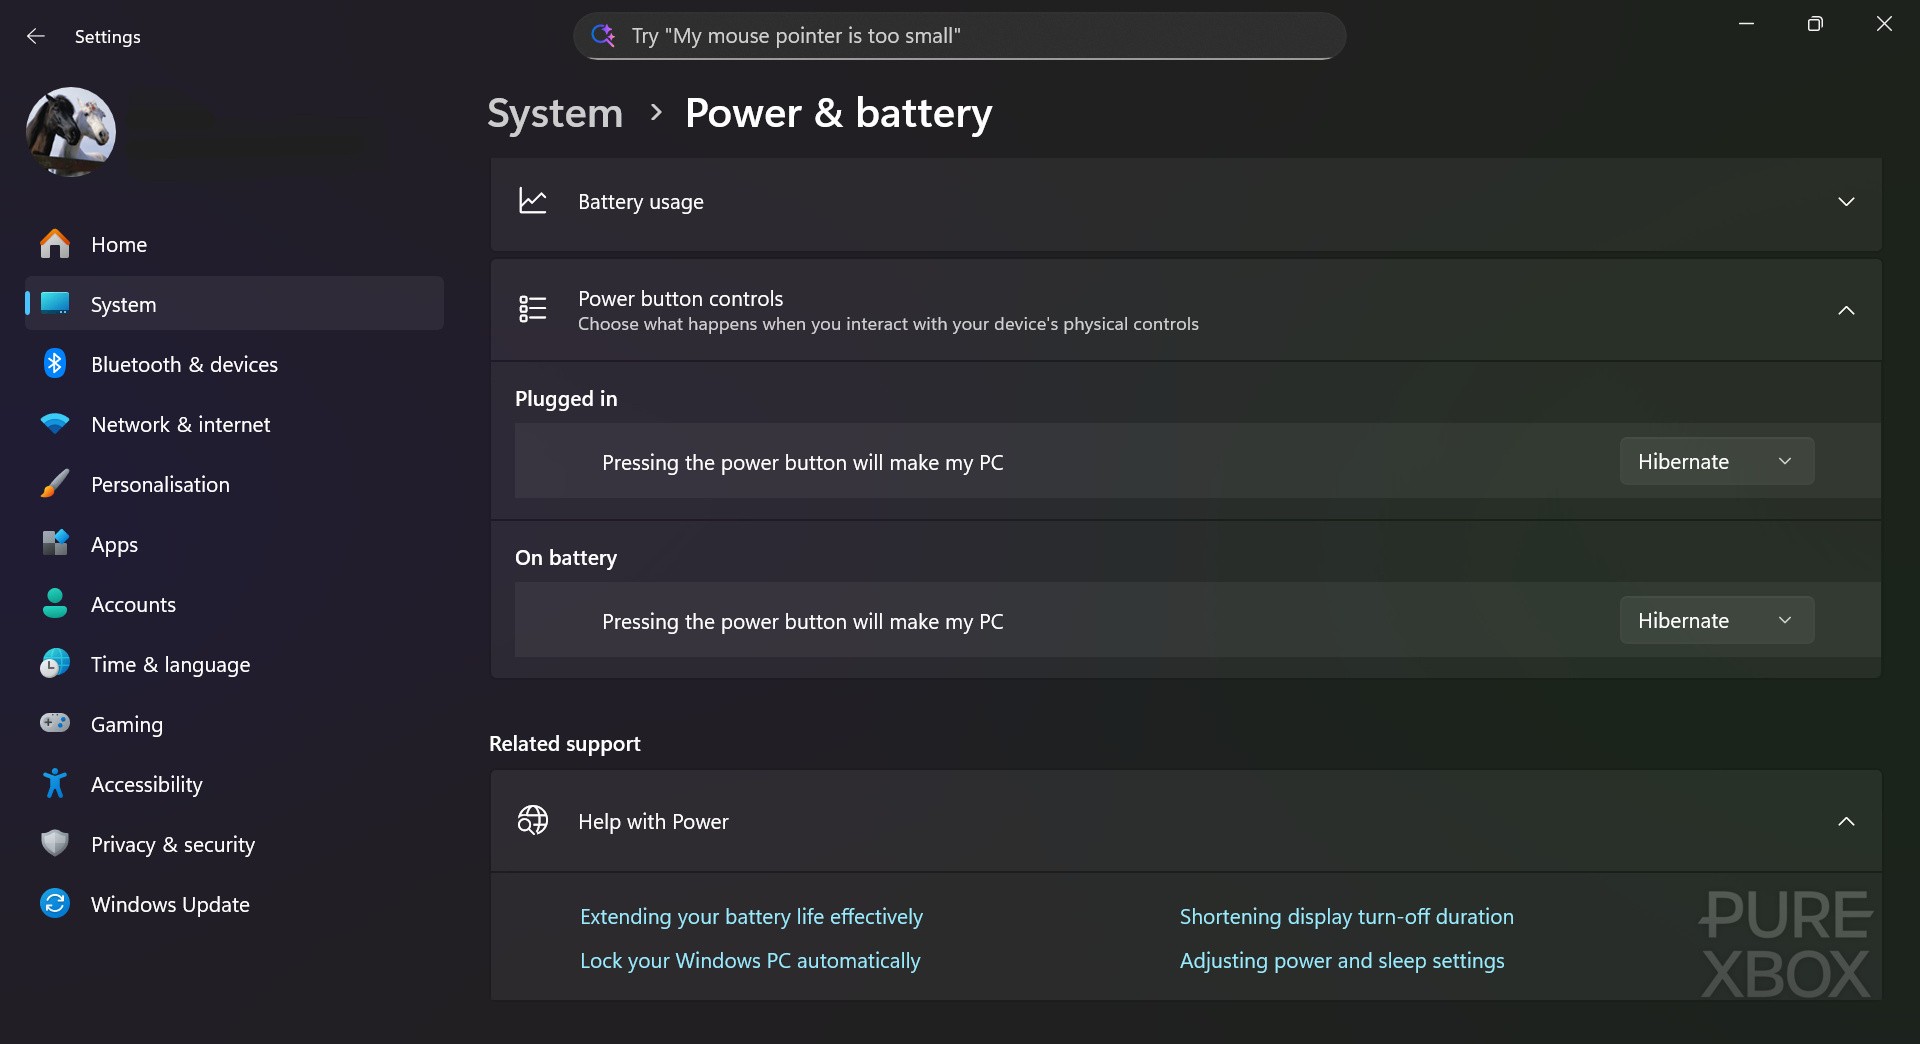
There isn't really a Quick Resume alternative on any version of the ASUS ROG Ally, and that includes the new Xbox versions of these devices. However, you can create a makeshift alternative by going to the Windows desktop, heading into the settings menu, and customising the power button to go into "Hibernate" mode when you press it.
Alternatively, there's also a "Sleep" mode that allows you to wake the system more quickly, but it uses power while it's off - whereas the "Hibernate" mode seems to retain most of the battery but takes a little bit longer to come back on. In general, the "Hibernate" mode is still a bit hit-and-miss (sometimes it'll work flawlessly, other times it'll crash the game), but it's the closest thing I've found to Quick Resume so far.
3. Bring the brightness down to save battery
This sounds obvious, but the brightness settings on the ROG Xbox Ally are a little hidden away, and the different operating modes actually change your brightness when you select them. There are a few ways to locate the brightness toggle, and my preferred method is to press the Xbox button and scroll across to the settings menu - you'll see the toggle underneath the volume one (it has a symbol of two rectangles on top of each other).
Alternatively, you can press the Command Center button and adjust the brightness on the left-hand side next to the "Open Armoury Crate SE" button. Again though, keep in mind that when you change the operating mode, the toggle will move on its own - the lower the power, the higher the default brightness will be.
4. Familiarise yourself with AMD FSR & RSR

In certain games like Hogwarts Legacy, Indiana Jones and the Great Circle and DOOM: The Dark Ages, you'll see something in the in-game menu called AMD FSR, potentially with a separate toggle that allows you to turn on Frame Generation. The idea behind this technology is to reduce the game's resolution and then upscale it (therefore boosting performance), with Frame Generation working to intelligently add extra frames and (in theory) provide an extra-smooth experience.
It's worth experimenting with this option at the very least when it's made available, as it can provide some truly superb results. However, plenty of games don't support AMD FSR, and so there's an alternative in the Command Center menu called "AMD RSR". Turn this on, and you'll supposedly benefit from a similar technology to AMD FSR that works at the driver level. You'll find even more tools like this in the "Performance" menu when you go to the Armoury Crate application - have a play around and see what works best for you!
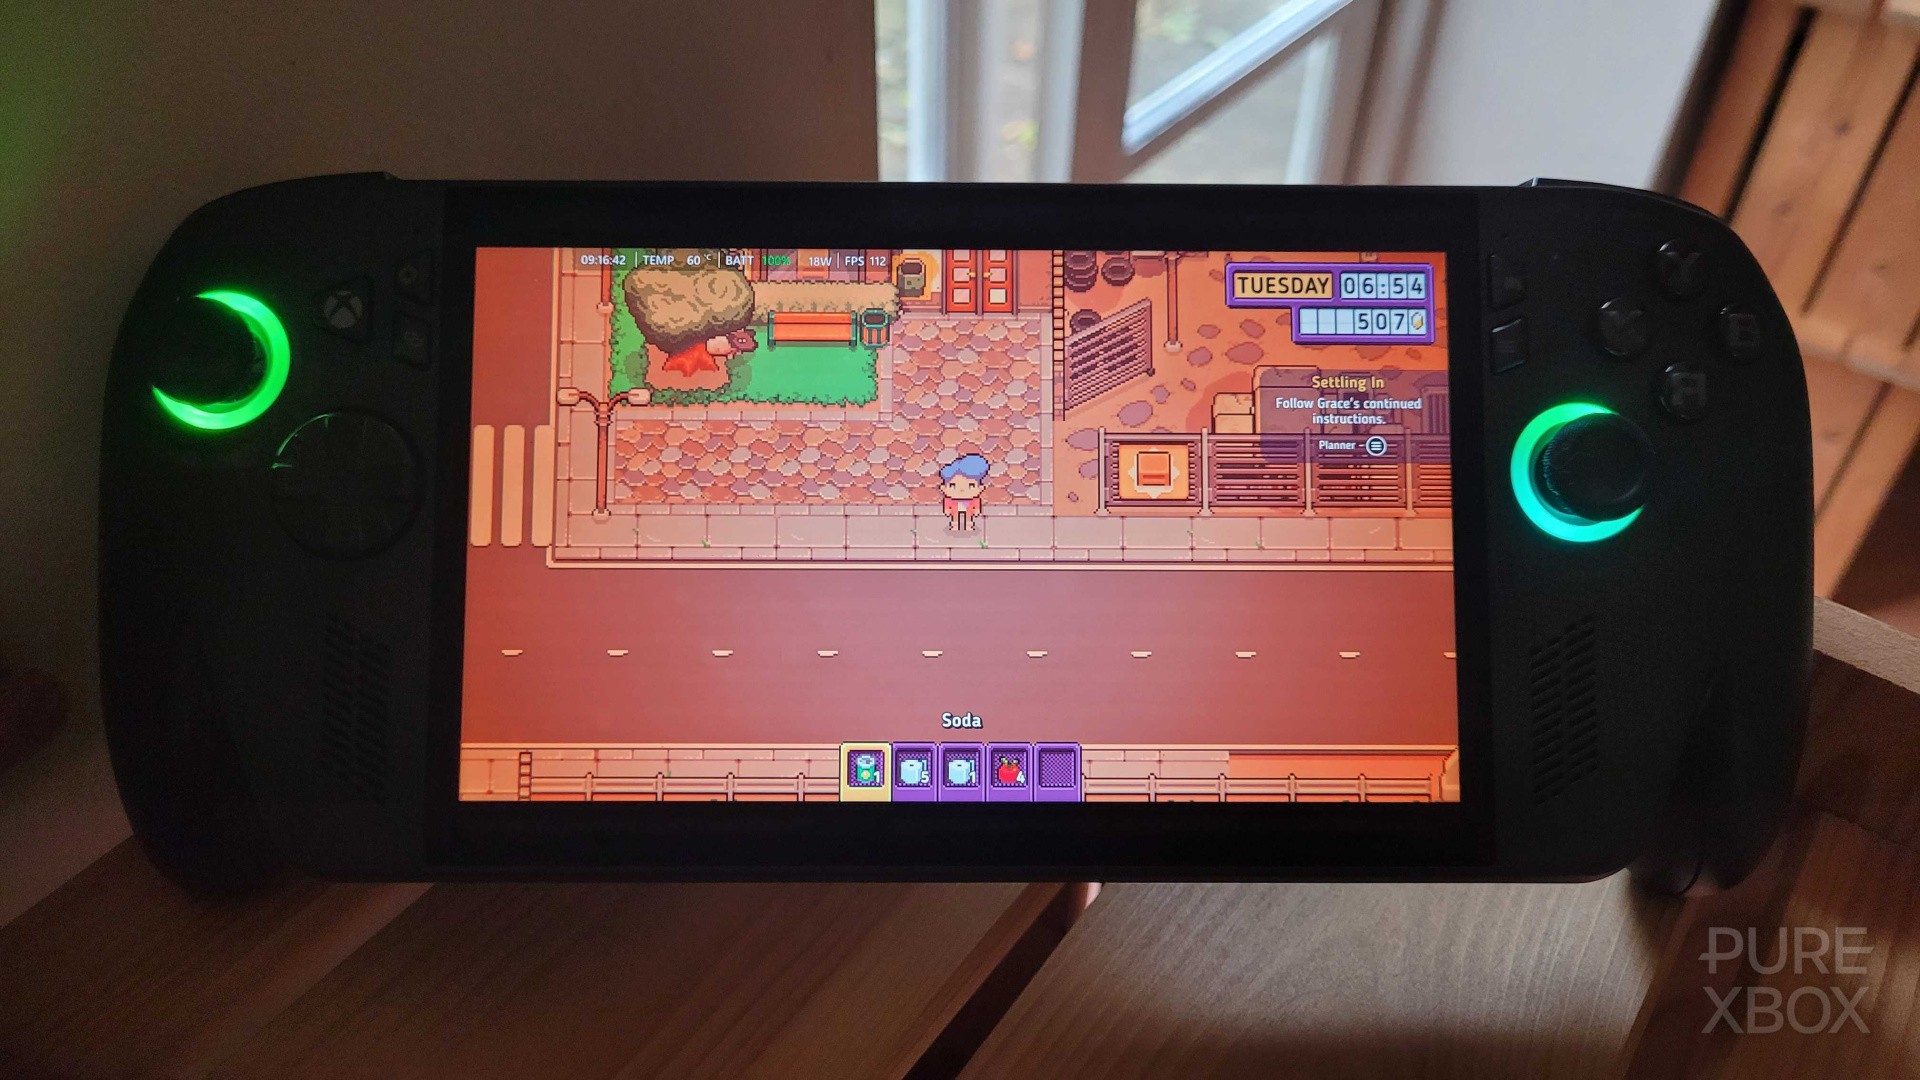
5. Activate the real-time monitor
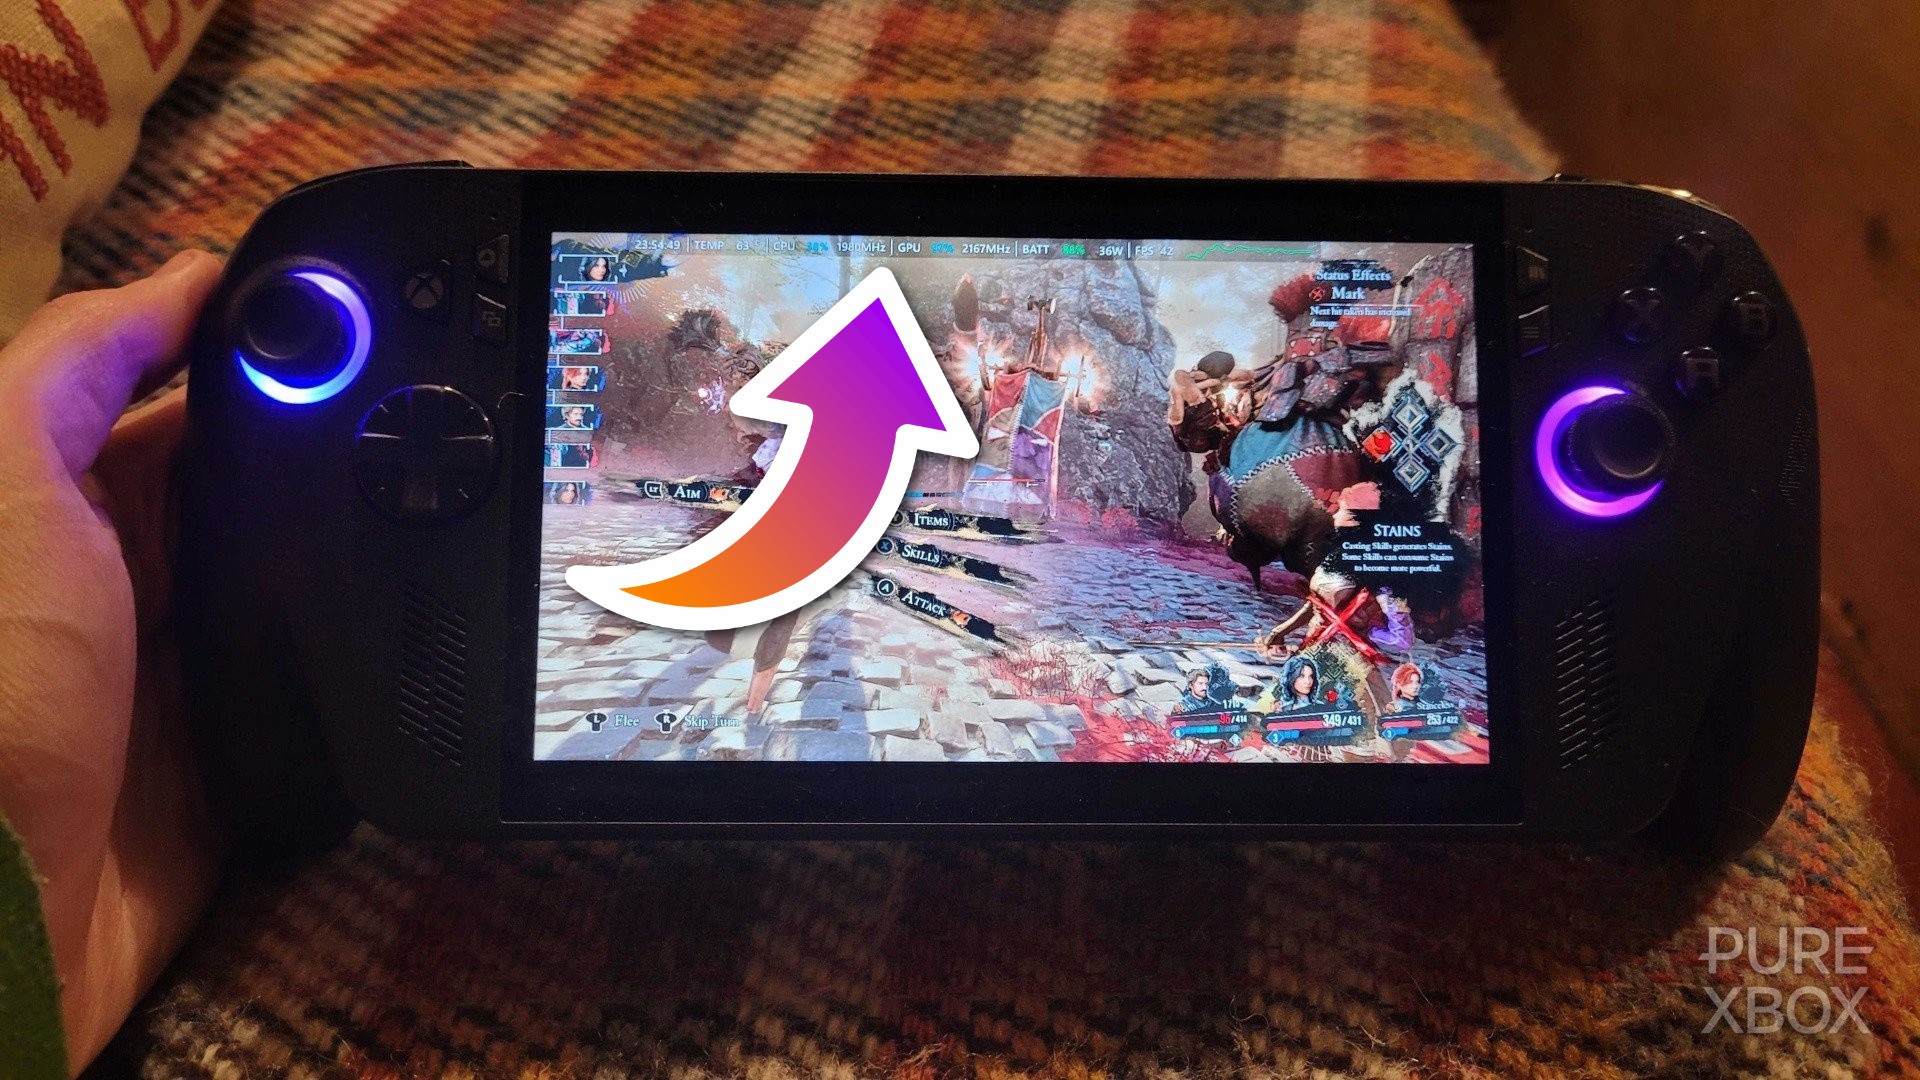
When you press the Command Center button on your ROG Xbox Ally, one of the features you can turn on is the real-time monitor, and this allows you to view statistics for things like the battery, internal temperature and frame rate. Even if you're not that bothered about any of this, it's going to help you understand why a game is performing the way it is.
For example, if you boot up Clair Obscur: Expedition 33 and find that it feels choppy, or perhaps that your system's fans seem to be overly loud, you can use this information to tweak the settings - such as changing the graphics preset, dropping the resolution, limiting the frame rate, or anything else you feel needs to be adjusted.
6. Turn off CPU Boost

Another thing you'll see in the Command Center is something called CPU Boost, and this'll be turned on by default. The idea behind this feature is to give the CPU a boost (unsurprisingly!) when it's needed in particularly demanding games, but for the most part it doesn't seem to offer many significant benefits based on my early experiences.
Turning this off, at least for the time being, should help to save battery. If you find that a game seems to be struggling, you can always toggle it on and see if does anything - you might get a few more frames per-second by using it.
7. Know how to customise and switch between gamepad and desktop control modes
Depending on what you're doing with your ROG Xbox Ally, you may want to either use gamepad controls or desktop controls (the latter providing a mouse that can be wielded with the right stick). To switch between the two, all you need to do is press the Command Center button and look for the "Gamepad" toggle.
If you want to customise these further though, open the Armoury Crate SE application and select "Configure" underneath the Control Mode banner. In here, you can map specific buttons (great for changing how the mouse works, for example), choose how sensitive the triggers are, adjust the feedback of the vibration, and a whole lot more. The "Game Profiles" button in the Command Center also lets you set up control configurations for specific games and apps.
8. Hold the Xbox button to quickly swap between different apps and games

You're going to get used to tapping the Xbox button to mess around with settings, check your social stuff, play around with captures and much more, but it's actually long-pressing the Xbox button that'll prove most useful. By doing this, you go into a switcher menu where you can jump between different tabs instantly, as well as close them when you're finished with them.
Try and get in the habit of closing multiple tabs to ensure your system isn't getting bogged down by too many applications, and don't forget this is your gateway to the Windows desktop too - it's accessible at the bottom of the screen next to the "Xbox full-screen experience" button.
9. Make sure you restart when going from desktop to the Xbox full-screen experience
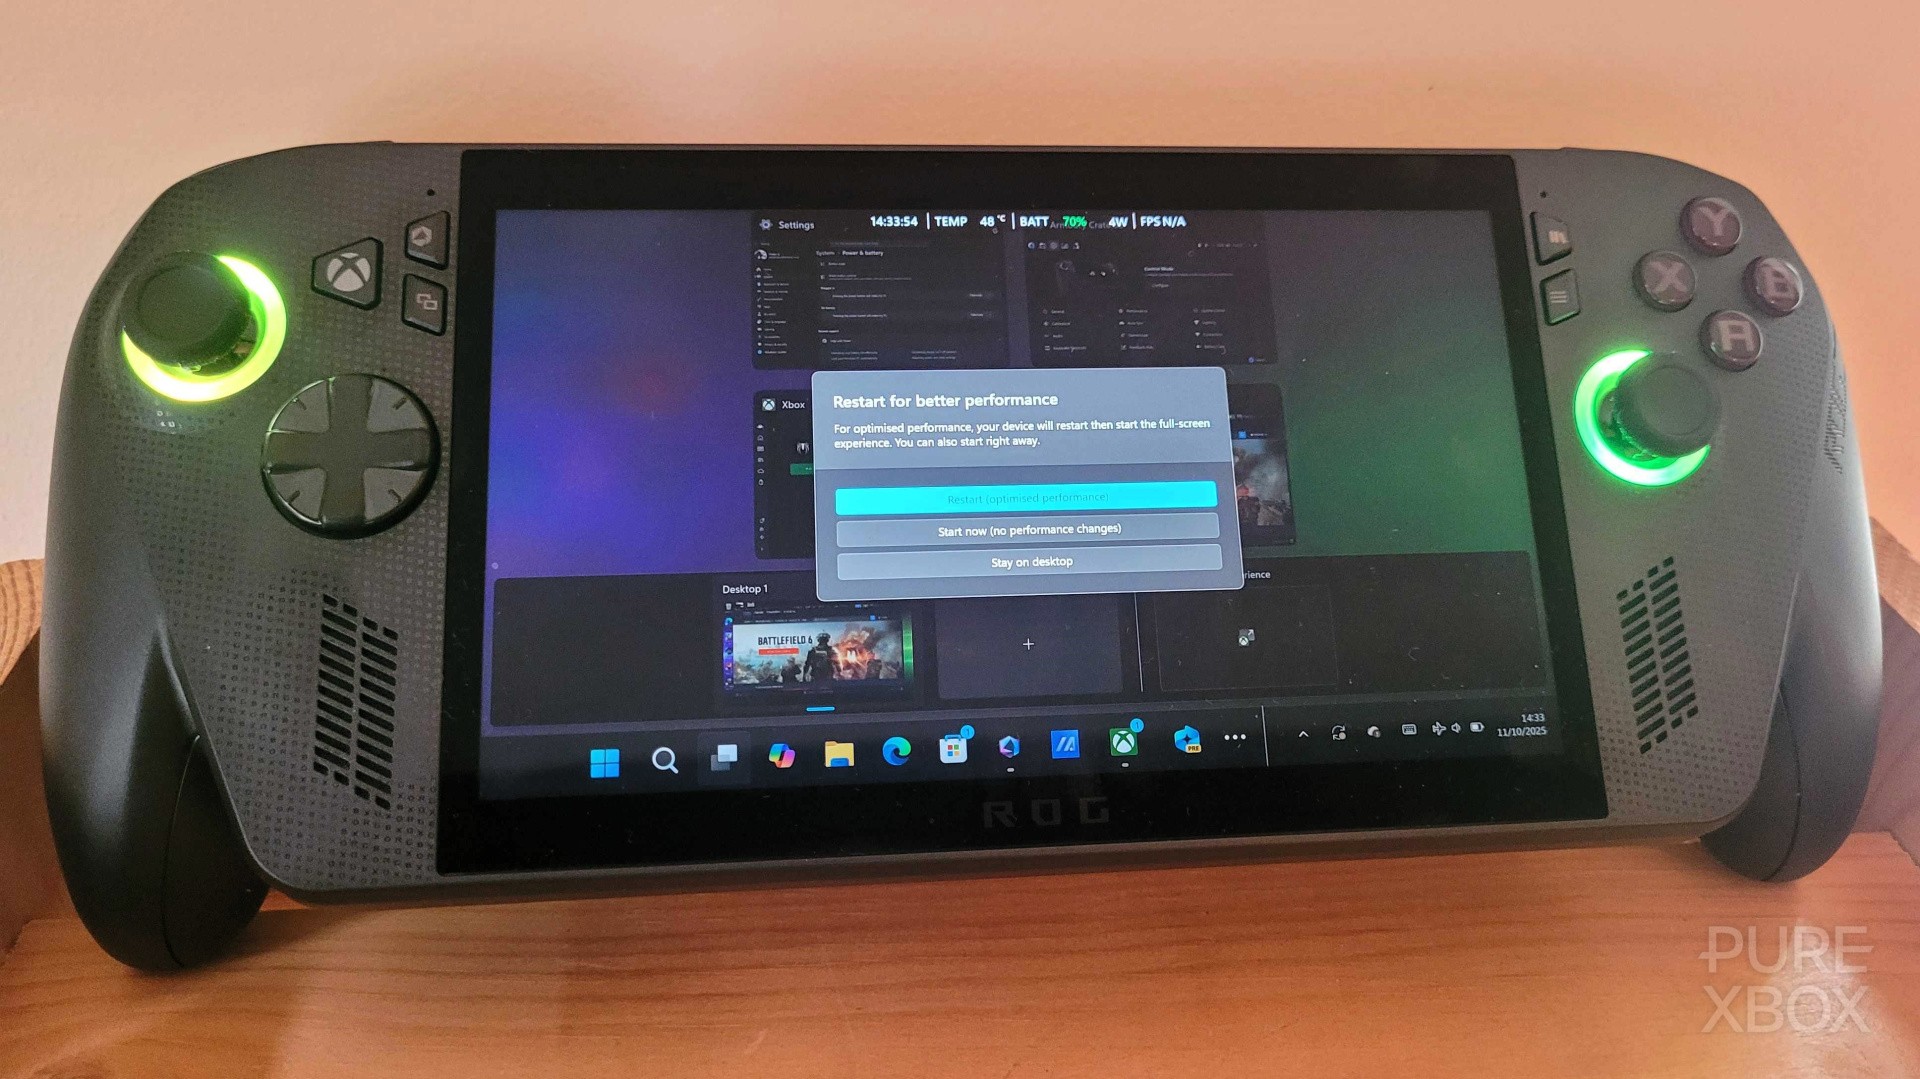
As mentioned in section eight, long-pressing the Xbox button on the ROG Xbox Ally will allow you to visit the Windows desktop. However, when you go back from the desktop to the Xbox full-screen experience this way, you'll be asked if you want to restart your system to ensure it remains as optimised as possible.
This is something you definitely want to do every single time! Basically, the Xbox full-screen experience disables a bunch of Windows processes that aren't needed for gaming, so even though a restart might feel cumbersome, it's going to ensure you get the best performance out of your titles - and you'll only have to wait about 10-20 seconds.
10. Learn how to install Widgets (for easy access to Spotify!)
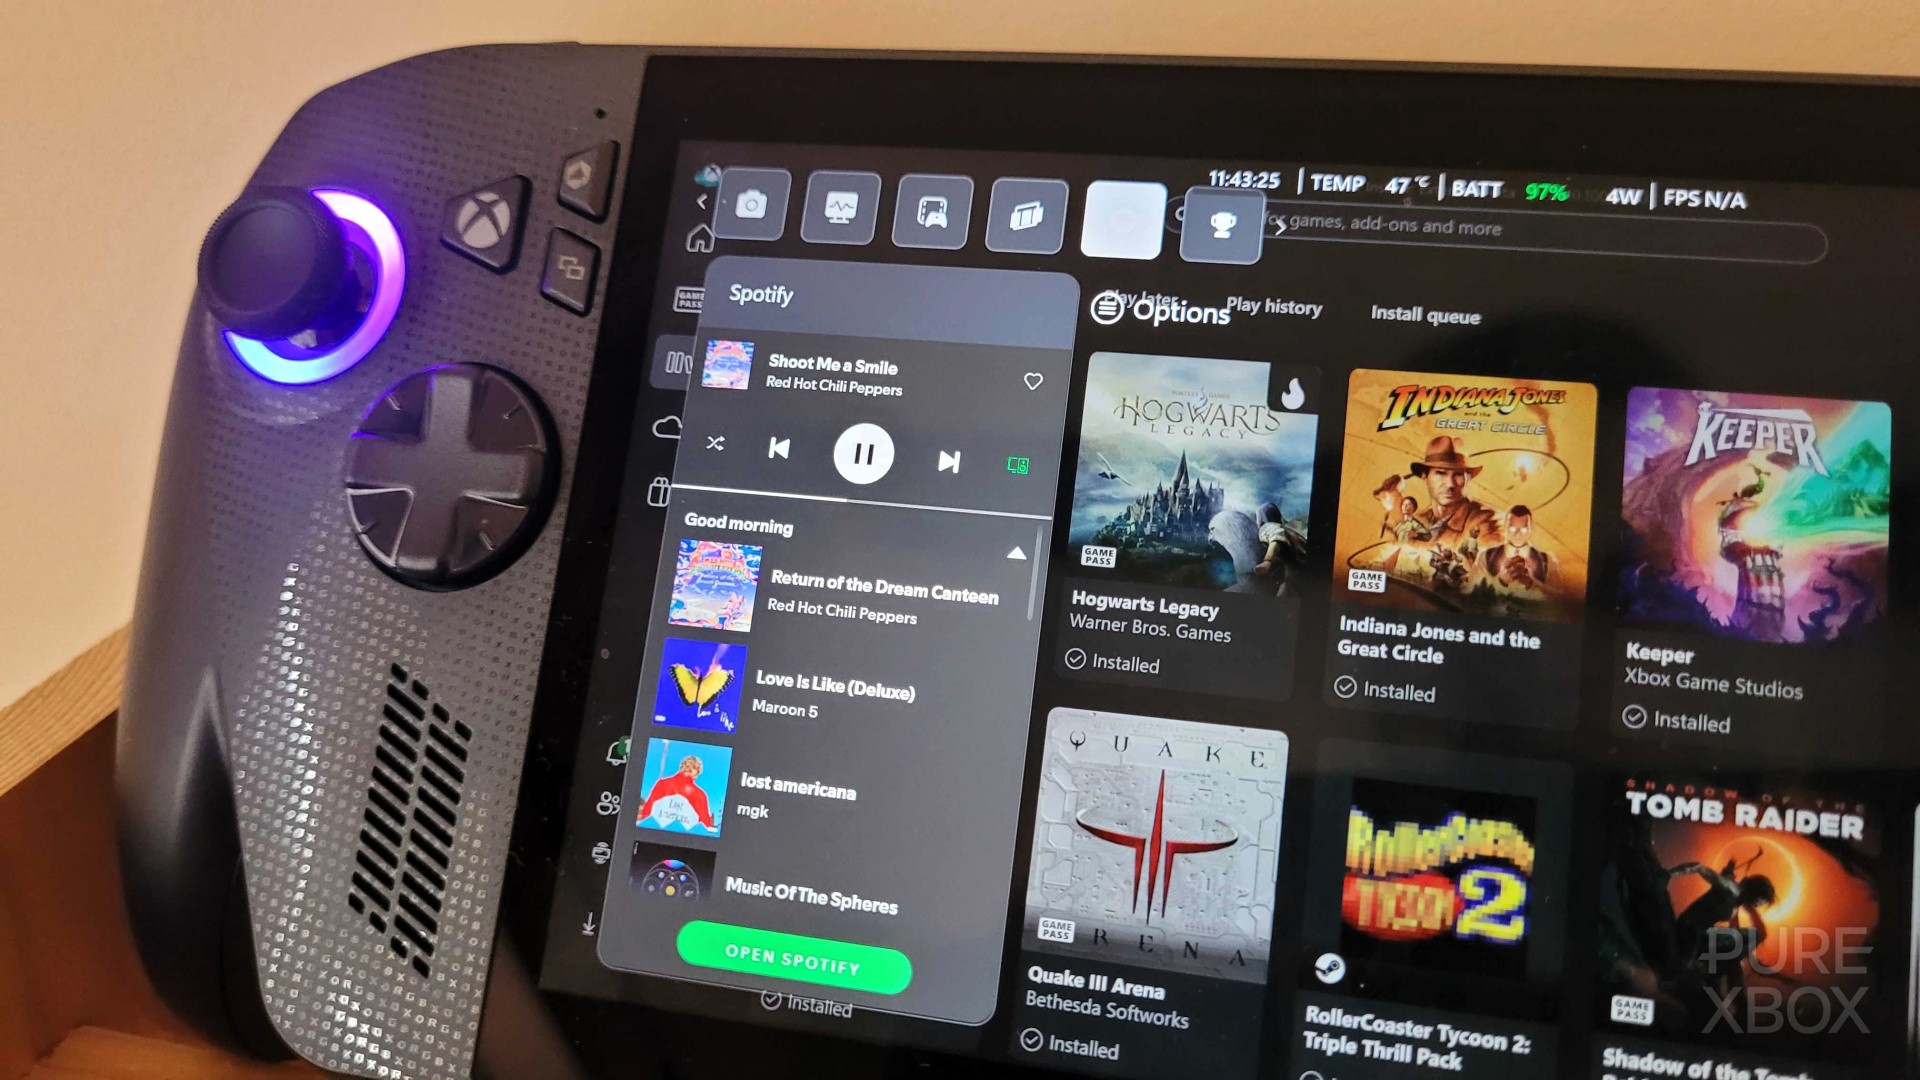
If you're anything like me, you're probably going to want to play games on your ROG Xbox Ally whilst also listening to Spotify, and there's a really easy way of doing that on the system. Simply press the Xbox button to bring up the guide-like menu, and then tap RB until you reach one of the final few sections called "Widgets".
In here, you'll see a button for the "Widget Store", and this will allow you to install Spotify (amongst various other things) at the click of a button. Once it's installed, it'll get its own section on the guide-like menu, meaning all you have to do is press the Xbox button and scroll across to the Spotify tab using the RB and LB buttons.
Of course, there are loads and loads of ways to customise your ROG Xbox Ally experience and you'll discover them as you play over the coming days, weeks and months - so don't stress too much about knowing everything on day one.
Just get the basics done, install some games, and start enjoying yourself! This is an awesome handheld that you're bound to have fun with, and there'll be plenty of time for tinkering as time rolls on.