Need a walkthrough for Act 2 in Scorn? You've come to the right place! In this Scorn guide, we'll reveal how to complete the puzzles in Act 2, and we've also provided images to help you along the way. In Scorn, this part of the game is known as "Act II", which you'll notice when you go into the save game screen.
Scorn: Act 2 Walkthrough
Note: Act 2 (II) is comprised of two parts, the first of which is simply the initial walk through the open landscape at the beginning of the level. As such we've bundled the entire Act together as one sequence.
We kick off Act 2 with a wasteland ahead of us that we need to simply move forward through in order to reach the next indoor area where more puzzles await.
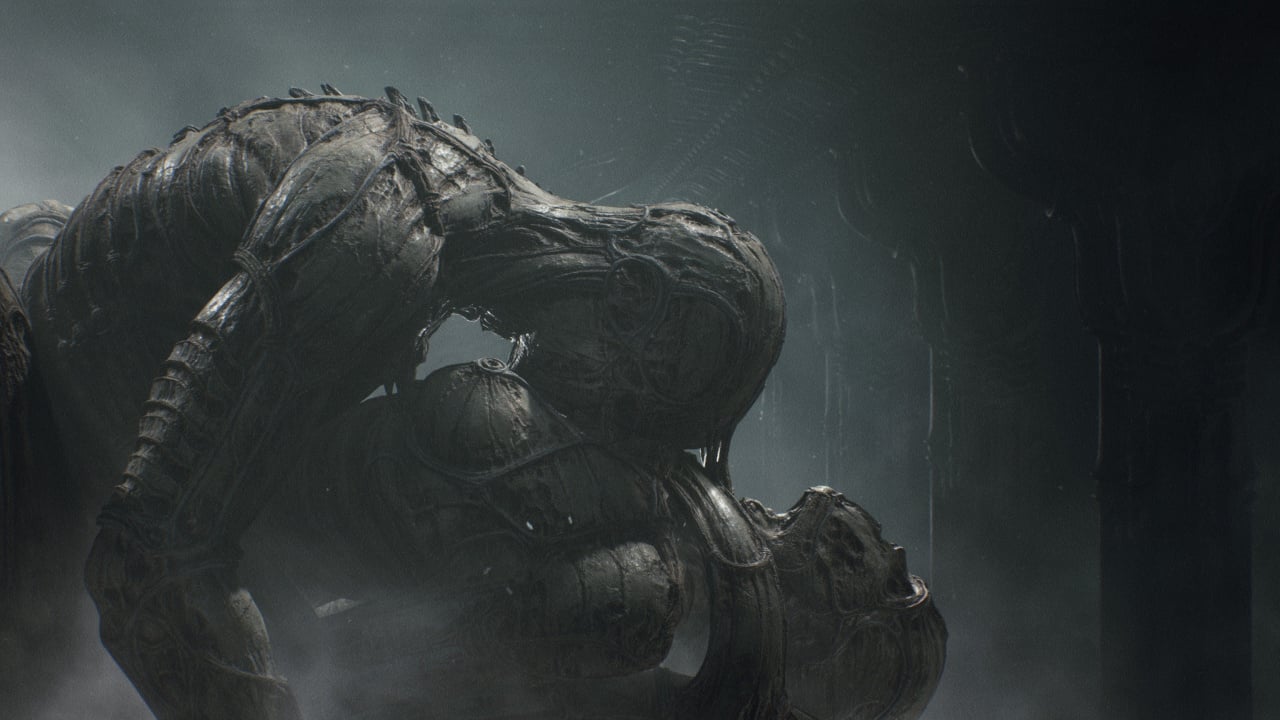
Once you’ve arrived at the monumental building that gradually appears out of the desert fog, head around to its right side, keep on moving around here and you’ll see an illuminated entry ahead where you can gain access to indoors. Head in and follow the corridors around, take the stairs up and you’ll eventually arrive in the chamber full of alien growth – and some strange noises – that we’ve pictured below.
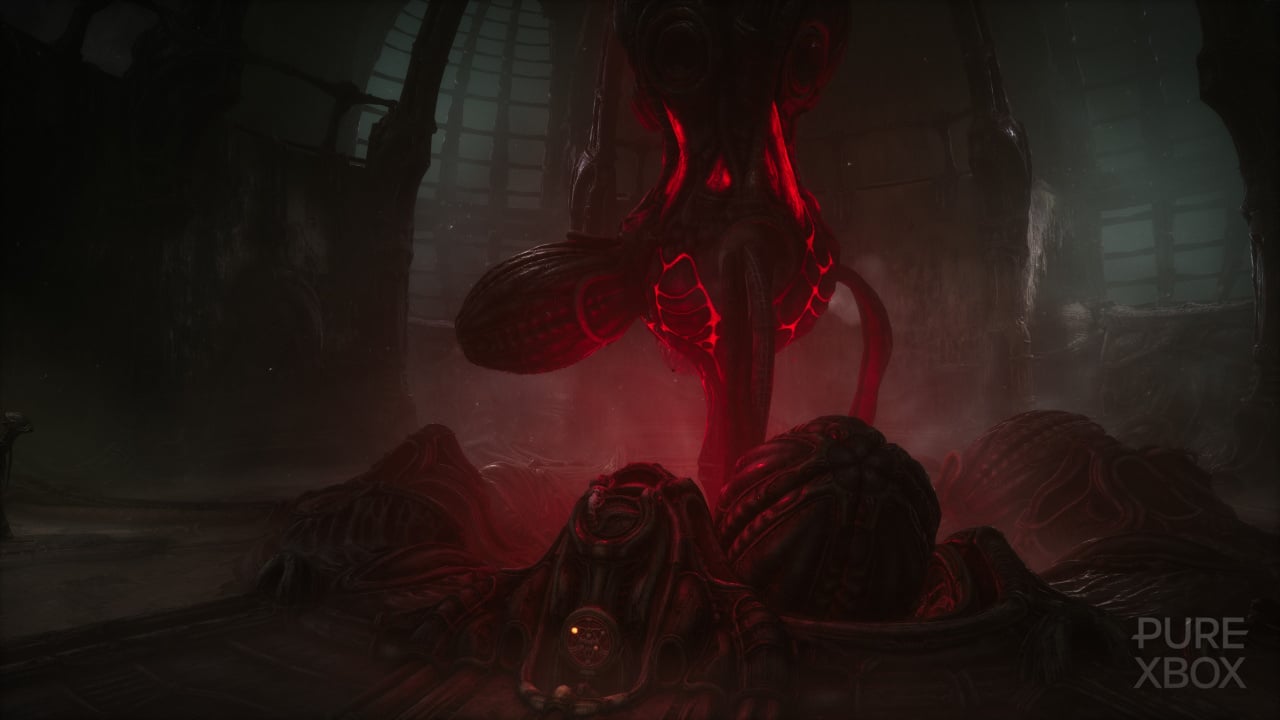
From here to the left is a dead end so let’s go right and along until we reach a doorway where you’ll see a creature hanging from the ceiling. Head on through towards it, it will scurry away. Now keep moving along the corridor until you come to an opening on your left where you’ll see a large glowing red alien organism. Let’s head over towards it. You’ll find there are three consoles to interact with there but we lack the tools to do so just now, so let’s go find them.
Head back out from the red organism and take a left then keep moving until you come to the door we’ve pictured below. You can’t enter here just yet, but turn around and you’ll see another console with a corpse slumped on the floor beside it. Interact with the corpse to retrieve a new device then plug it into the console and engage in a simple spinning lock puzzle, heading anti-clockwise and interacting in order to gather all three rings and then interacting once more with the northern-most point to complete the task. You’ve now added one bone ring to your device.
Now, let’s return to the red organism and insert our new device into the console indicated in the pictures below. A gate will open to your left and one part of the red organism will temporarily drop down revealing a console, but this will then retract. Let’s head round through the newly opened gate now to find a lift button, call the lift down and ride it up to the upper floor.
Make your way around to the right now, through the doorway and then head right again to reach the arched tunnel pictured below. Interact with the console here and you’ll find you have a choice of three green entrances to choose from. The one to your far right is blocked with bodies, so for now we’ll go into the entrance that’s furthest to the left. A tunnel will emerge that takes us across when we interact with the console.
Once out the other side of the tunnel head in and take the only doorway here to the right and you’ll find the console we’ve pictured below. It’s another lock puzzle, but this time it’s moving. In order to solve this, listen for the click made by the machine as it rotates then line your device up with the position where the click happens and press “A” when the lock passes your device in this location.
Keep doing this three times to gather all of the circles of the mechanism then point your device northward and interact to complete the puzzle. Easy!
We now need to head back down the lift and interact with the console at the red organism once again. This time two pods will drops down, revealing two consoles, but they will once again retract. We need to head back up to the tunnels above now and enter the next green doorway.
This time we’re taking the green entrance shown below, so let’s interact with the console to get over there. The first thing you’ll see on entry to this area is a large fan with multiple blades. We need to stop this fan to proceed. Head off to the right and up and then take the first left on the first floor, follow the corridor around and you’ll reach a large circular room with an organism in the centre.
Head left in this room and down the open corridor to find yourself at the back of the large fan we passed earlier. There are three red connectors here that you can remove to stop the fan from turning. Once you’ve done this there’ll be a short cutscene which sees you end up with the multitool we had earlier in the game. Backtrack now along the corridor and back to the fan and head through the gap in its blades. You’ll reach the console shown below, interact with it to start another lock puzzle which you complete in exactly the same way as the last one. You’ve now got three bone rings on your device.
There’s a lift to your immediate right here beside the lock puzzle, take it down and interact with the first device on your right to attach a tool to your left hand. Now open the door straight ahead and we’re back in the first area near to the red organism so let’s head over there and interact with it once more. This time three pods come down and then go back up again. We need another bone ring for our device. In order to do this we need to clear the bodies away from the final green entrance.
To clear the bodies we want to reach the console above the three green entrances, shown below by reaching the console that we’ve also picture below. To get here take the green entrance that’s two places to the left of the one that’s blocked with bodies then head through the corridor and take your first left. Once at the console, interact with it to clean out any entrance you’ve directed your cursor over. Simply direct it to the bodies and watch them clear away. With our cleaning done we can now head over and past where the bodies were to find a small area with one more lock puzzle to solve.
This final lock puzzle is half obscured by a metal plate but it’s the same idea as before and you simply need to read where the noise is happening and gather up the three elements of the lock before interacting with the most northerly point to complete the puzzle. Congratulations, we now have all the rings we need on our device and can make our way back to the red organism once more. This time four pods will lower and lock in place and your device will slide along to the console at the centre. Here we have another puzzle to solve.
We’ve got four red notches and four white ring lights on your device. You need to manoeuvre your device to lock each white point to a red one. To beat this simple puzzle, you need to think to match the first white light - the one on the left of your device - to the furthest away red light, the next white to the next furthest away red and so on until the fourth white ring, the one on the right side of the device, goes in the nearest red light. Easy!
Once you’ve completed this, head over to the red organism and interact with the front console to grab a door key device and a health pod/ammo pouch which we’ll be making use of from here on in. Now that we’ve got our door key with one light on it, we can head back to the locked door with the corresponding lock, as shown below, to end Act 2 and begin the next part of the game!
Did you find our Act 2 Walkthrough for Scorn useful? Check out our full Scorn guide for more help with completing the game, including all acts and puzzles.


Comments 0
Wow, no comments yet... why not be the first?
Leave A Comment
Hold on there, you need to login to post a comment...