Microsoft has revealed today that it has started bringing the Xbox Series X and S 'Auto HDR' feature to gamers on PC, with the feature now rolling out in preview for members of the Windows Insider Program.
The company says when it's enabled on your HDR capable gaming PC, "you will automatically get awesome HDR visuals on an additional 1000+ DirectX 11 and DirectX 12 games," accessible via a simple toggle flip.
We've left all the instructions for you below, and here's what Microsoft has to say about the rollout:
"Auto HDR for PC is in preview and we’re on a journey to continually improve it with you. For example, we haven’t yet enabled Auto HDR on all top DX11/DX12 titles since some are hard to identify as Auto HDR eligible; we also think turning on HDR just for gaming is harder than it should be.
We’re already working on fixing those issues, optimizing performance, and even adding customizability to your experience. While Auto HDR does take some GPU compute power to implement, we don’t expect it to significantly impact your gaming experience. However, if you notice significant issues in your gaming experience or find one of your favorite DX11/DX12 titles doesn’t work yet, please let us know through the feedback hub app."
How to Enable Auto HDR
Getting the Right Hardware
From a PC hardware perspective, if you have an HDR monitor equipped PC, then you’re good to go! If you’re looking to get an HDR monitor to try Auto HDR, we strongly recommend you acquire one that is HDR certified.
Joining the Windows Insider Program
Auto HDR for PC is currently a preview feature only available in the Windows Insider Program (Dev Channel). To experience this feature now, you’ll want to click here to join and get access to build 21337 or above.
Global Feature Toggle
Once part of the Insider Program (Dev Channel), if your PC monitor is already configured to use HDR, you will automatically receive the Auto HDR PC gaming experience. Otherwise, to explicitly enable/disable Auto HDR, look no further than the Windows HD Color Settings page.
Enabling
- Open Settings then go to System->Display
- Click the Windows HD Color Settings link
- Scroll down and make sure that the Use HDR toggle is On
- Keep scrolling and you will find the Auto HDR toggle. Flip this to On as well and that’s it. It’s that simple.
Disabling
- Open Settings then go to System->Display
- Click the Windows HD Color Settings link
- Scroll down and you will find the Auto HDR toggle. Flip this to Off.
Splitscreen mode!
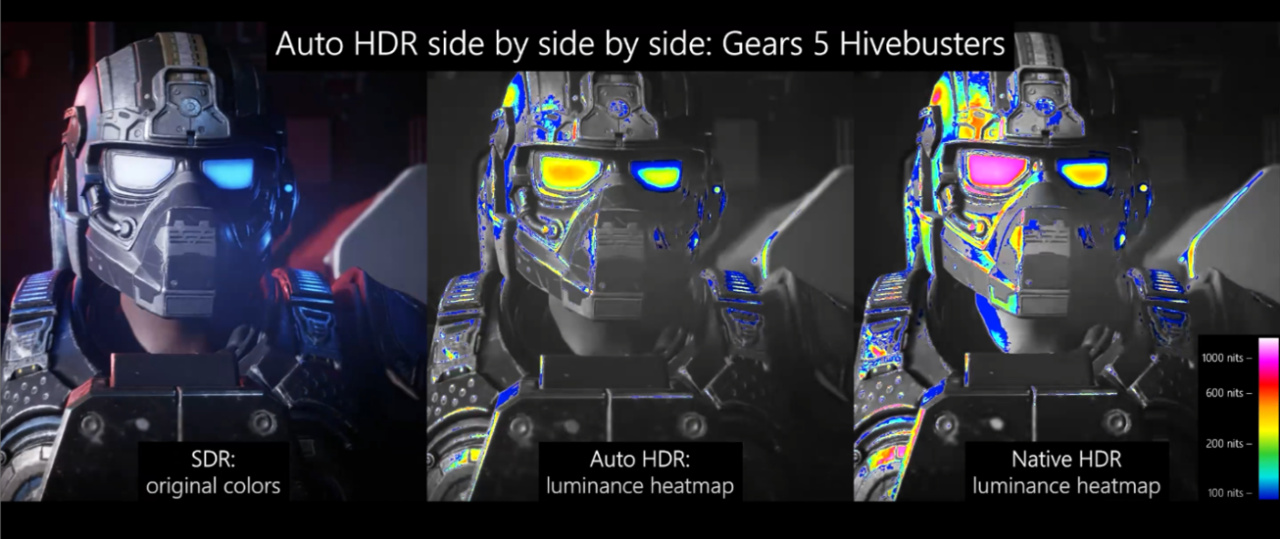
Want to see how awesome your 1000 nit HDR monitor looks when displaying Auto HDR content? Well, we have a cool little “only for development and evaluation” secret feature for you! You can enable a splitscreen mode where the left side shows the original SDR content and the right side shows the Auto HDR upgraded content.
This is only for advanced users but if you want to give it a go, here’s how:
- Open an admin command prompt
- To enable splitscreen, run the following command:
reg add HKLM\SYSTEM\CurrentControlSet\Control\GraphicsDrivers /v AutoHDR.ScreenSplit /t REG_DWORD /d 1
- To disable splitscreen, run the following command:
reg delete HKLM\SYSTEM\CurrentControlSet\Control\GraphicsDrivers /v AutoHDR.ScreenSplit /f
Will you be trying Auto HDR on your HDR capable gaming PC? Let us know down below.
[source devblogs.microsoft.com]


Comments 3
Hahah damn. And I just moved my PC from my HDR screen too.
Shame Windows 10 is bloody awful for HDR, I wish you could just turn it on in the games without having your desktop completely washed out or the wrong colours altogether
@Steel76 the Xbox PC app is surprisingly rubbish all round especially compared to Steam and I've already had several games that failed to work and had to be reinstalled or having to jump through hoops to get Sea of Thieves to work. If it wasn't for Gamepass I'd never touch it again
Show Comments
Leave A Comment
Hold on there, you need to login to post a comment...