
There are fifteen high value targets to take out in Halo Infinite and each one will net you plenty of valor as well as a slick new weapon variant that you can grab any time you like at all of your currently liberated Forward Operating Bases (FOBs).
In order to reveal the locations of these high-ranking Banished baddies you'll need to take control of FOBs, as doing so automatically fills your in-game map with all nearby points of interest, including the exact whereabouts of these special enemies.
Subscribe to Pure Xbox on YouTube30k
We've got down and dirty with all fifteen of these mouthy mercenaries already and have put together a guide showing you exactly where to find them all, just in case you can't be bothered to liberate any FOBs, as well as throwing together a few quick tips on how best to take them all on.
You may also be interested in the following Halo Infinite guides: How To Beat Halo Infinite's Bosses, All UNSC Audio Log Locations, All Banished Audio Log Locations, All Forerunner Artifact Locations, All High Value Target Locations which is all available, alongside plenty more, in our Halo Infinite Guides hub.
Halo Infinite - All High Value Target Locations
BRIGLARD
Most likely the very first target that you'll take on in the game, Briglard is a run-of-the-mill grunt who's somehow made a big name for himself as a murderous tough guy.
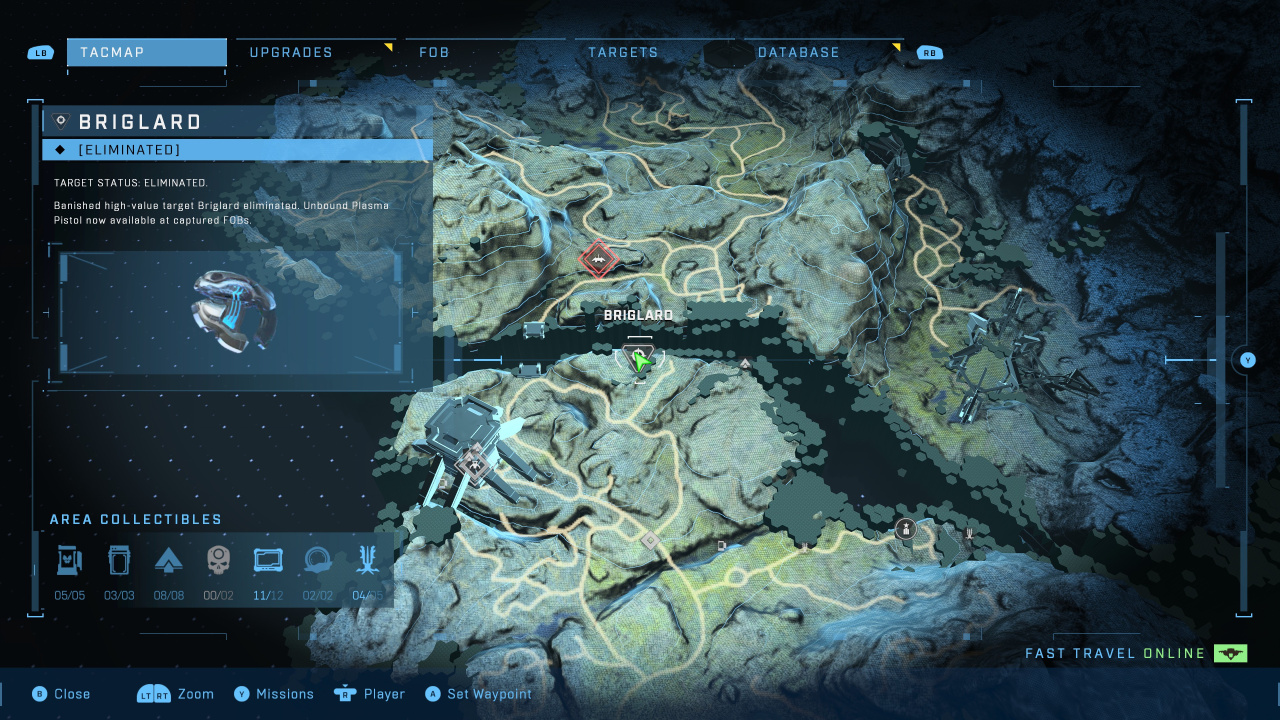
This is a simple, straightforward introduction to high value targets as Briglard has no special abilities and takes just a few shots to down. The main thing to look out for as you approach this one is his small band of followers who you'll need to mop up in order to complete the task at hand.
When you finish this uppity little fella off, you'll be rewarded with a sweet Unbound Plasma Pistol variant.
OKRO' VAGADUUN
This target can be found out to the west of the first area of the game's map, as illustrated below, and his whole gimmick is to hide in his stealth camo, so you'll need to use your threat sensor in order to pin down his location then soften up his shields, keeping pressure on him so you can do health damage once they're down.
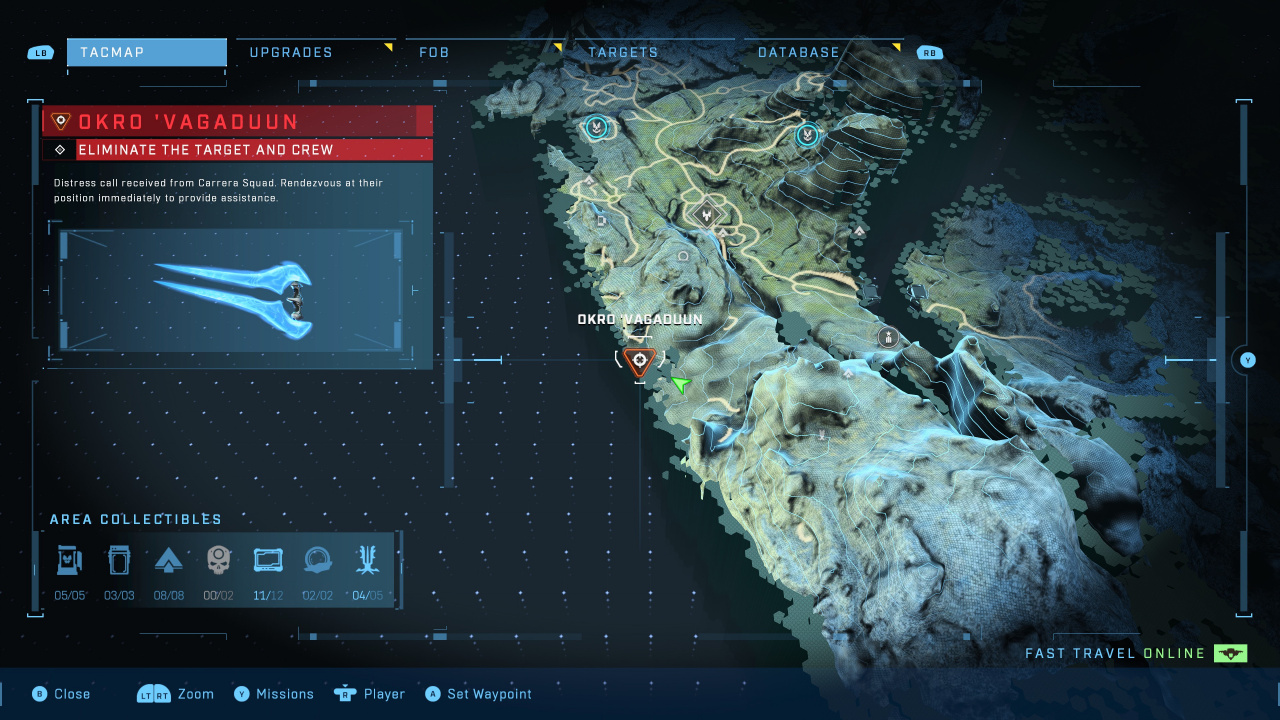
The main thing to beware of in this fight is the sheer number of goons in Okro's camp. It's best to thin them out from the flanks first, taking out any snipers etc, then finally move in and deal with the grunts. Once you've done this three personnel shuttles are gonna hit the area and you'll need to take out their brute occupants.
Once you've got this crowd thinned out, dealing with Okro isn't too difficult as long as you make sure to use your threat sensor to get a bead on him and, as soon as he's in view, absolutely hammer him with shots to take him down.
When you're done you'll be rewarded with a nice shiny plasma sword variant for your troubles.
IK' NOVUS
Located in the south west of the second area of the world map, as shown below, this guy is actually a bit of a pushover, going down to regular heavy fire and with quite a weak shield. However he is carrying a mini-cannon so be wary of getting caught in the open or too close to him.
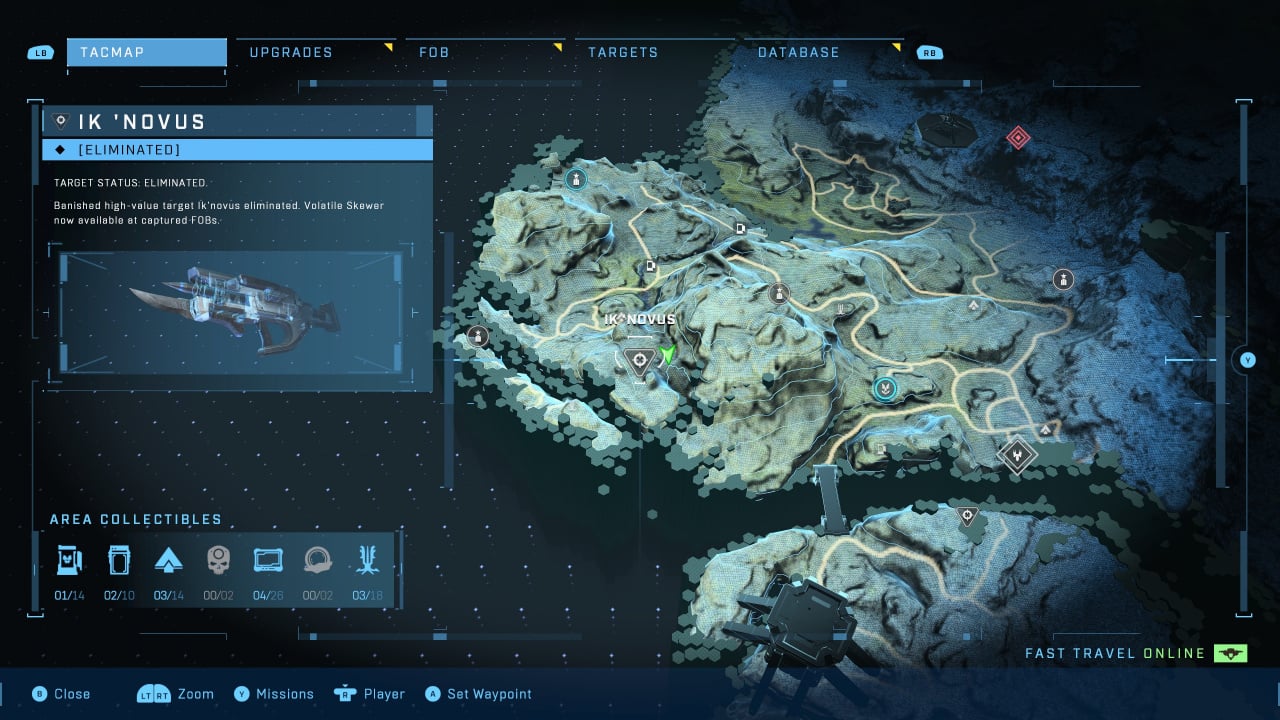
You'll also need to be aware of a sniper in his entourage who's taken up a vantage point overlooking the camp from a cliff, he can cause problems if you wade in. There are plenty of heavy weapons scattered around the rocks that flank the arena here so take care of that sniper then move around the outskirts pounding Ik 'Novus and his crew and you should have little in the way of problems here.
As a reward you'll get yourself a Volatile Skewer variant. Sweet.
ARTHOC
Found in the location shown below, Arthoc is actually pretty straightforward to deal with. He's slow moving, heavily armoured and wields a mini-cannon, but his camp is small and easy to wipe out, leaving you with just him to worry about, at which point taking cover and pounding him when he stops firing is all you need do.
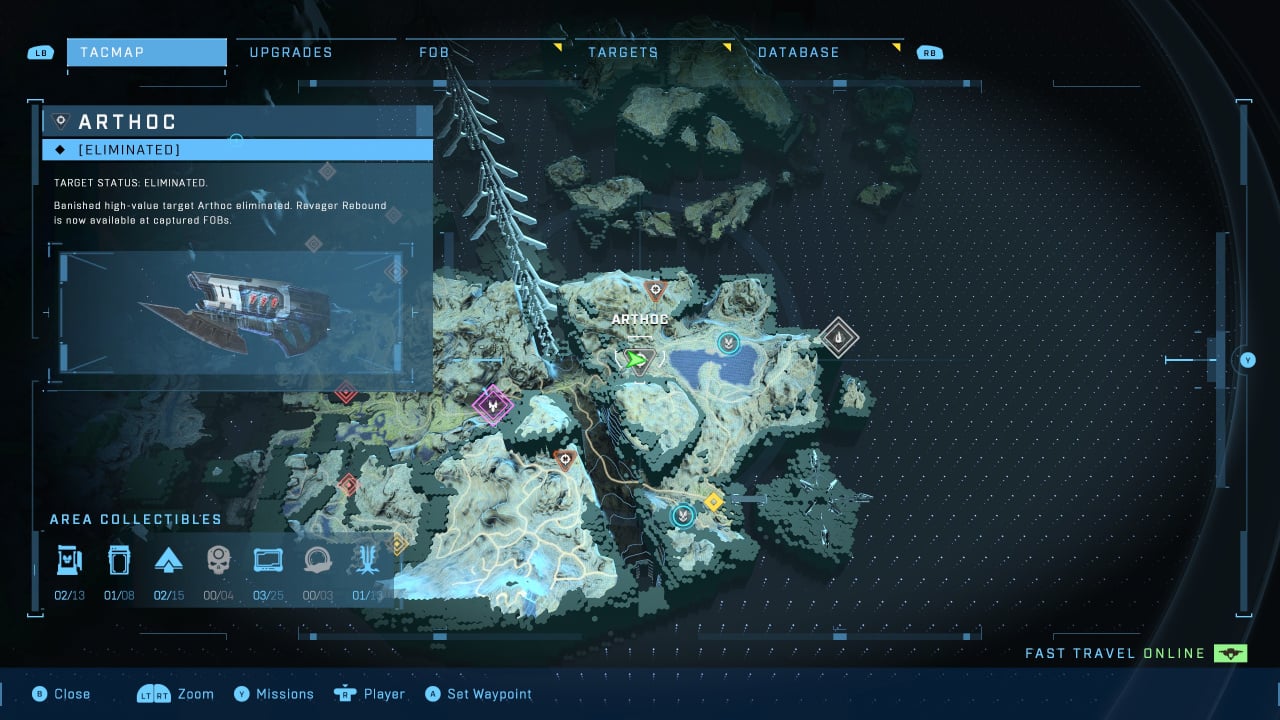
The one issue here as you arrive at Arthoc's camp is a brute on a Ghost who can be a nuisance if he catches you off guard, but we countered this by riding our own Ghost into battle and using it to destroy him and much of the rest of the crew quickly before finishing off Arthoc himself for a shiny new Ravager Rebound variant.
ZERETUS
This is a tough fight against a camp packed full of brutes, all of whom are carrying pretty heavy weaponry, including lots of rocket launchers. There's no real trick here beyond using cover, retreating when you need to restore shields and then going again.
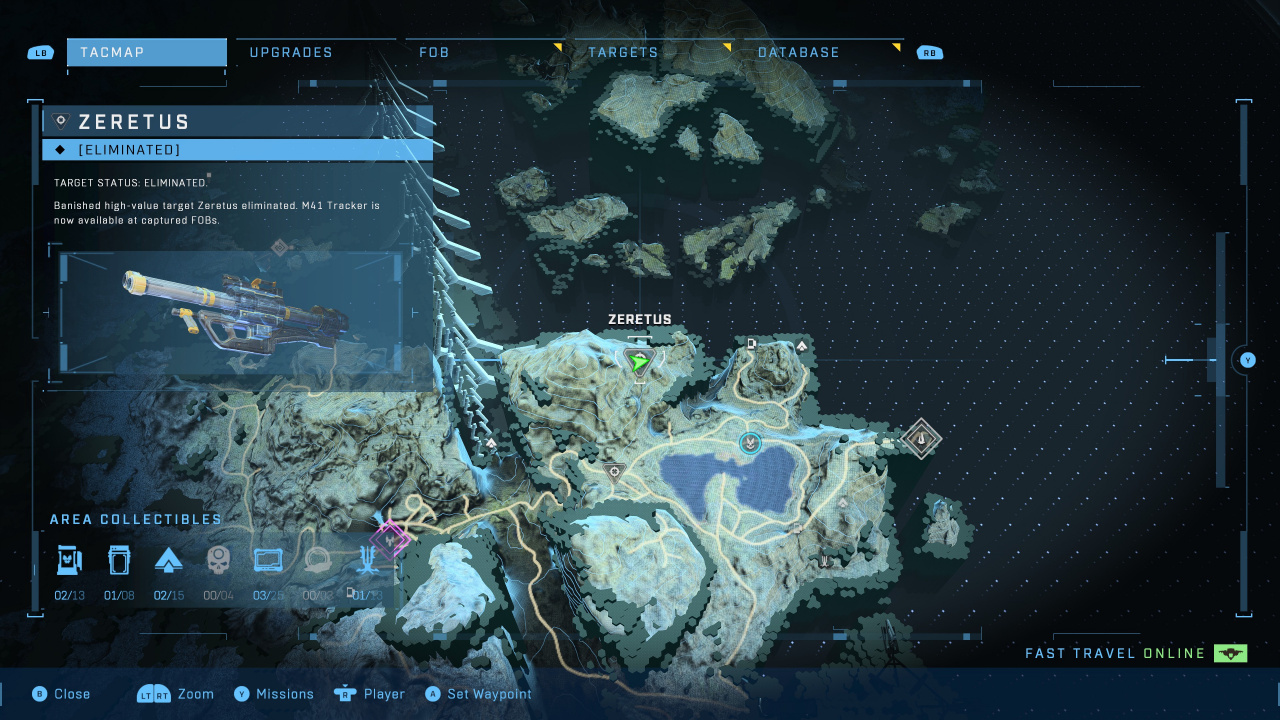
Zeretus himself can jetpack into the air and one-shot you if he gets a direct hit, so we found that a shock grenade, paralysing him momentarily, followed by every grenade and shot we could get in while he was stunned, to be most effective. It's a tough one, but make use of the heavy weaponry dropped by dead foes and hit him with shock grenades and you should be able to turn the tables eventually.
You will be rewarded with an M41 Tracker for your troubles. A beauty.
THAV' SEBARIM
This guy has got himself surrounded by ghost-riding goons so can be a little difficult to approach initially. We suggest some shock grenades to disable the vehicles and then perform a hijack on one where possible in order to then use it to soften up the pack.
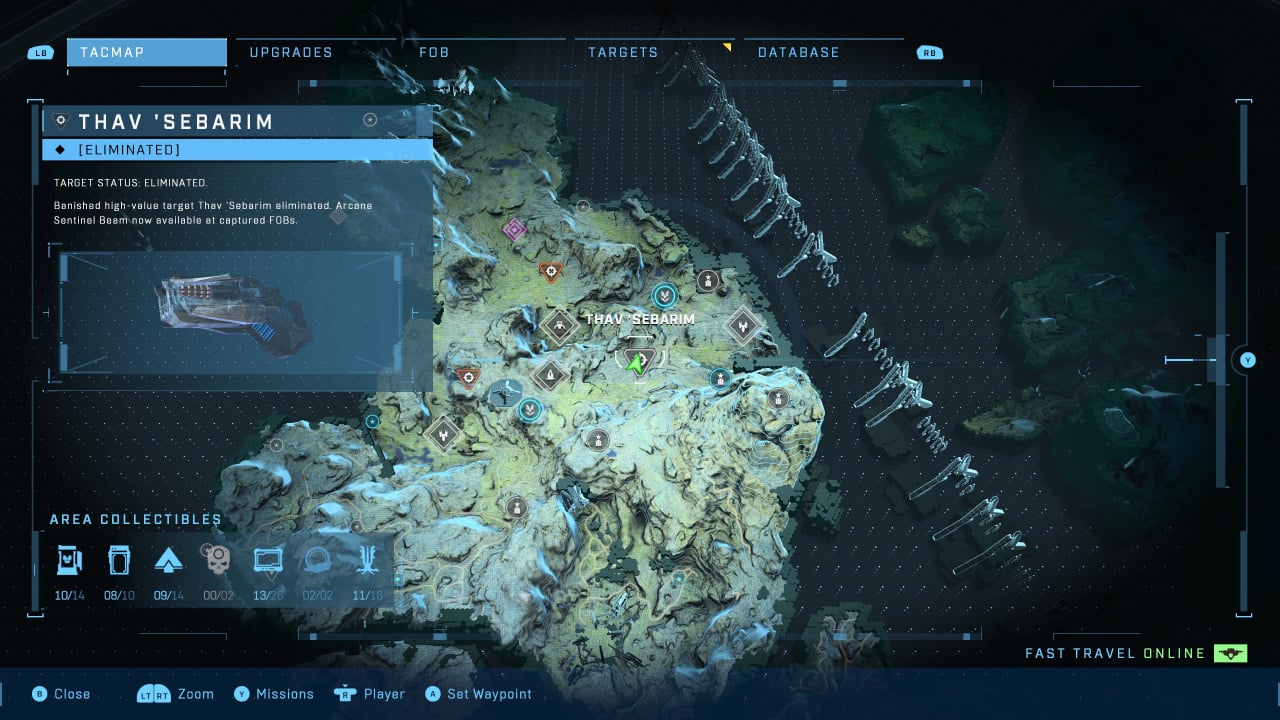
The weapon variant you'll get your hands on here is an Arcane Sentinel Beam and if you can grab it during the fight it does huge damage to everything in its path, although getting in close can be tricky so take care.
Thav 'Sebarim can also cloak so make sure to make use of your threat sensor for visibility if needed.
BIPBAP
Another grunt with big aspirations, Bipbap can be found at the location below and is flanked by a pretty decent sized crew.
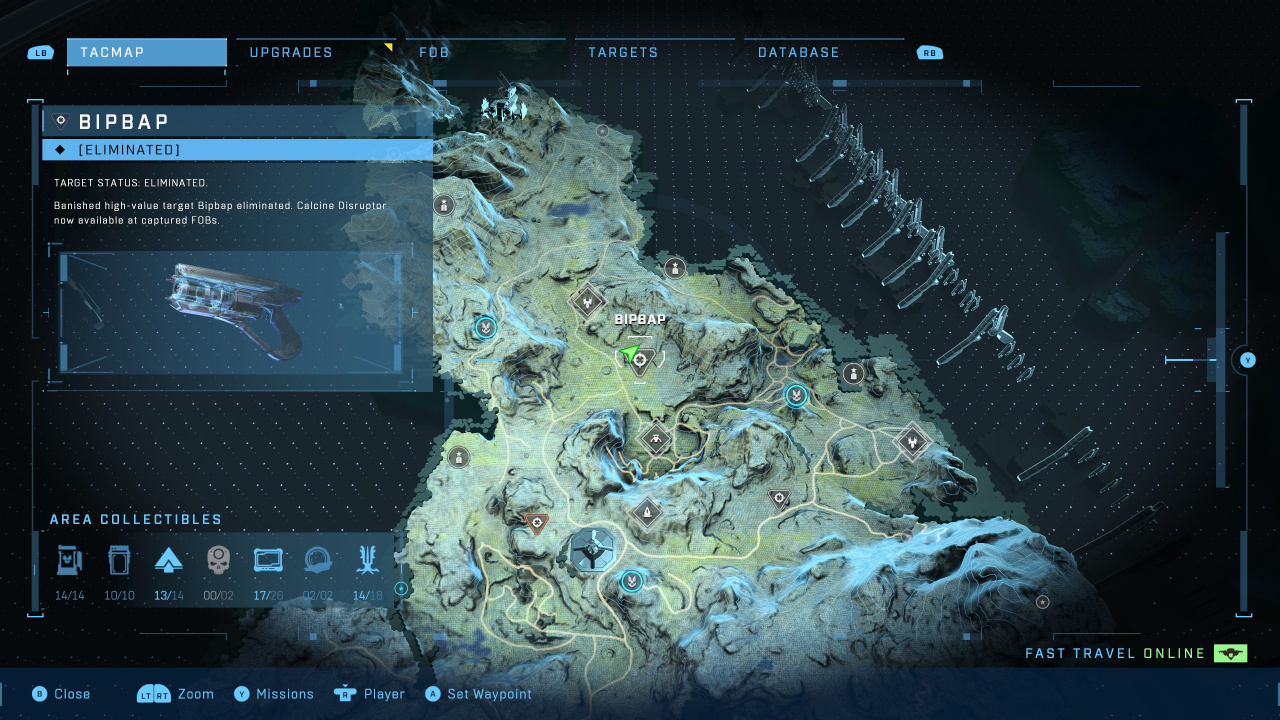
Charge in and grab the Calcine Disruptor variant at the middle of the battlefield here though and you'll make short work of them all as this gun blasts its targets sky high in a blaze of electricity.
There are some charging brute reinforcements at one point in this fight so be ready to take them down before they get to close, but otherwise this little fella is a bit of a pushover once you get him on his own.
INKA' SAHAM
Situated on a remote bluff right up the north of the world map, Inka's camp is a big one with multiple ghost riders, snipers and plenty more besides.
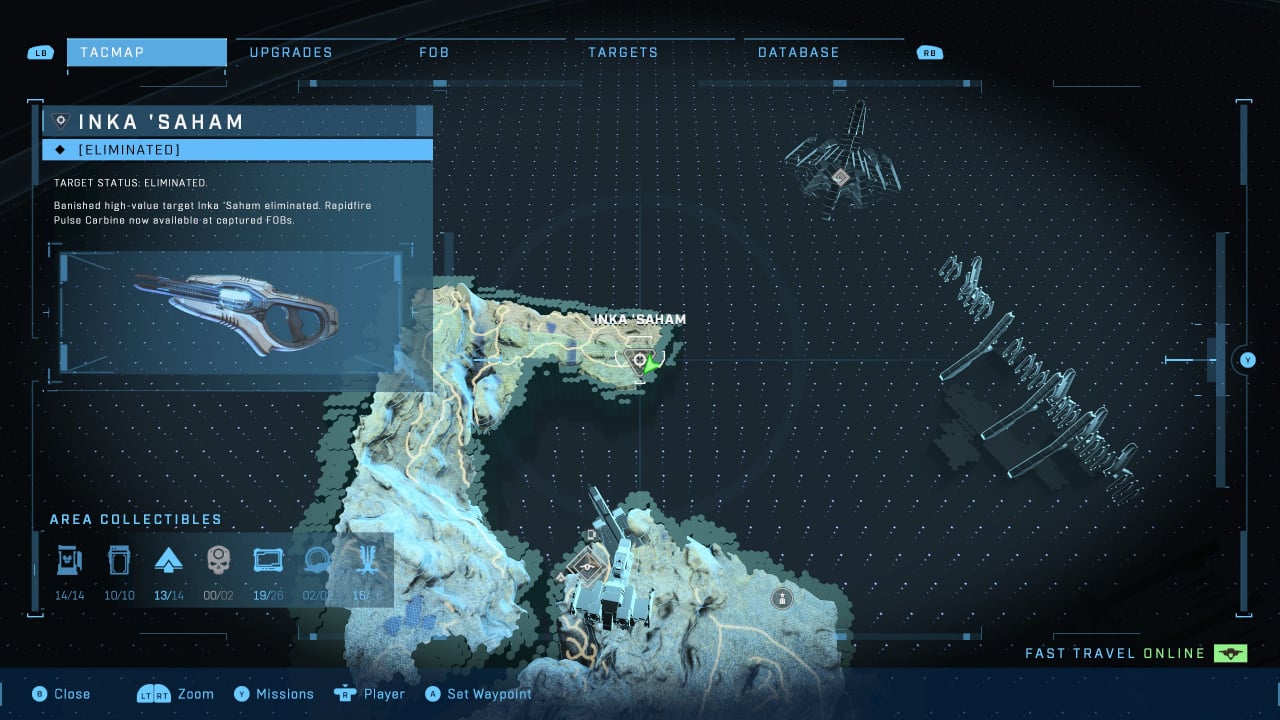
Our tactic here, rather than jump straight in and try to nab the Rapidfire Pulse Carbine variant this target is protecting, is to take down a ghost with shock ammo and use it to wipe out as much of the camp as we can. You'll need to approach with caution from every angle as there are two turret gun emplacements here, but soften up the flanks, take out the guns, hijack a ghost and you should be on easy street. Simple, sort of!
BALKARUS
A plasma rifle-wielding, jetpacking bad boy, Balkarus has got a large entourage to help him fight back and reinforcements to call in when things get tough.
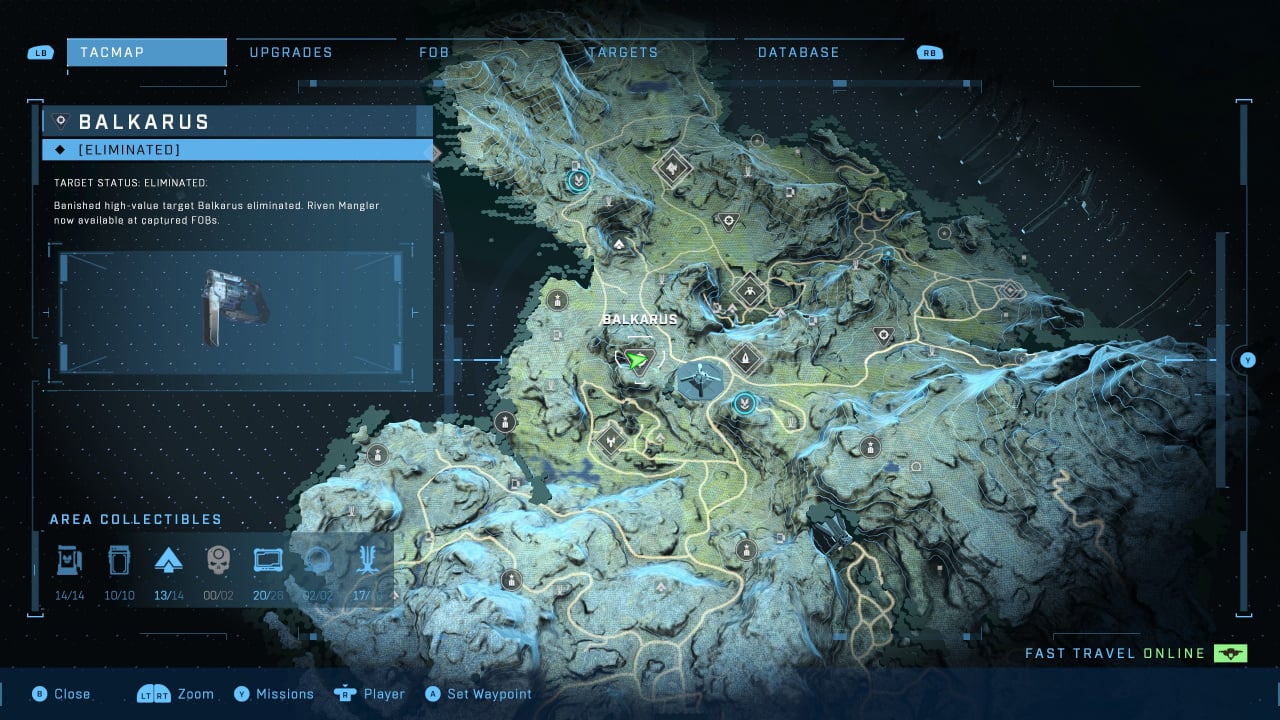
We once again recommend keeping to the fringes of the battlefield here as there's plenty of cover and some weapon racks to be had. Pick off grunts and elites until you've got the numbers thinned then prepare for reinforcements and rinse and repeat. Once he's alone, Balkarus is easy pickings with a weak shield and we ended up just getting in close with a shotgun to finish him off.
Remember to grab that sweet Riven Mangler variant from the camp before you leave too.
SKIMMER ALPHA
Skimmer may well be the weakest of the targets you'll encounter besides Briglard, it takes very few shots to take this one down, but you'll need to deal with their band of skimmers before you can get close.
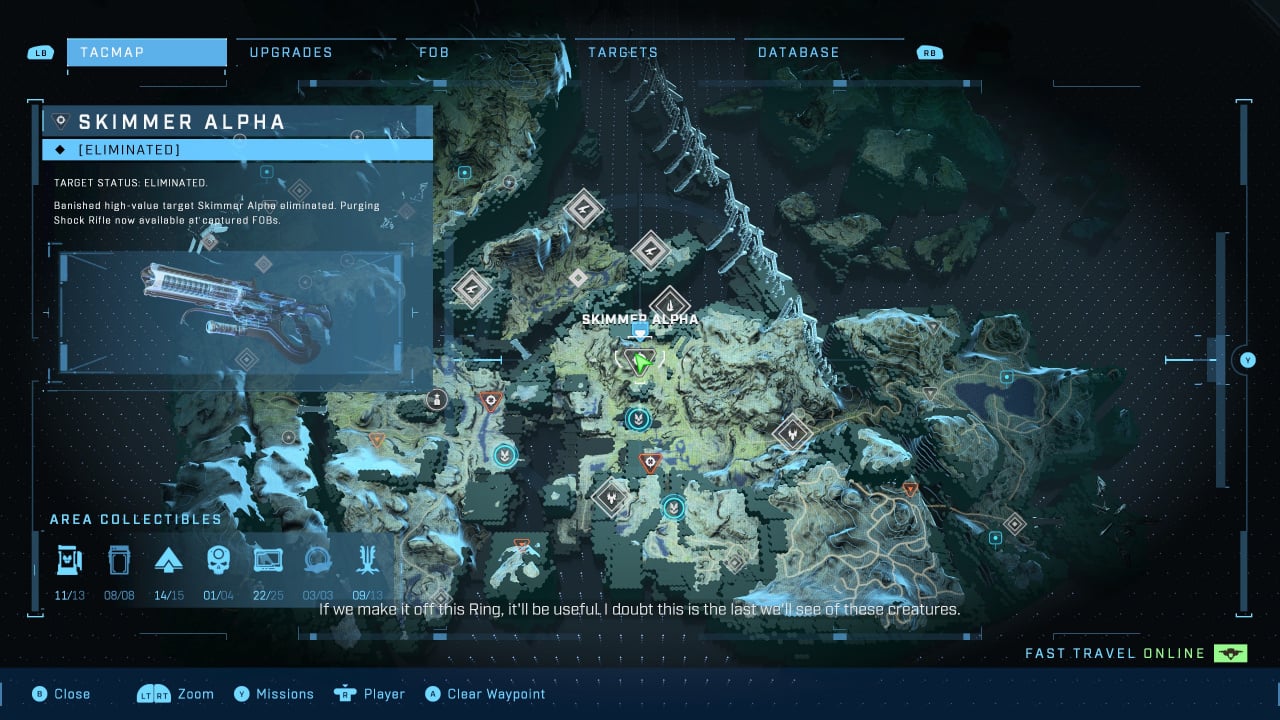
Your best bet for clearing this one with ease is to get up on one of the platforms overlooking the cave that Skimmer inhabits, you can see we've done exactly that in the pic below, and just pick off the entire crew one by one. Reinforcements will drop in, three brutes to be exact, so deal with them too, and then move into the cave for a quick and easy kill and the Purging Shock Rifle to add to your armoruy.
MYRIAD
One of the toughest challenges in the Targets roster, this is not one but two tough hunters located on a pretty wide open bit of terrain.
You need to think about your weapons and how you approach here, long-range is a good idea to soften them up as they have no shields, and we actually used a nearby ghost to get nearby and pick off their crew before doing as much damage to their health bars as possible before they destroyed the vehicle.
Another good idea is to run in and grab the Backdraft Cindershot variant in their camp, it does huge damage and, once you've got rid of most enemies in the area, isn't too hard to jump in and grab a hold of.
BARROTH
A renowned sniper, Barroth and his camp can be a tough challenge if you just wade in guns blazing.
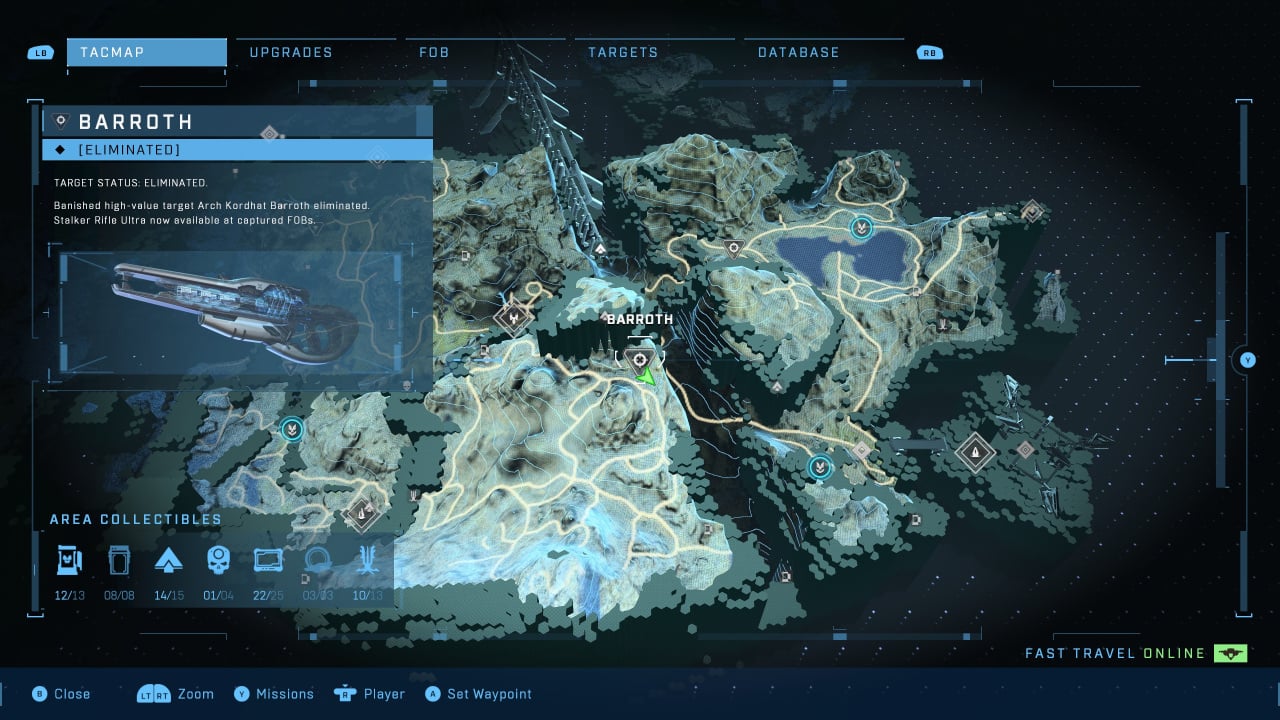
This sniper ace has got themselves positioned high up on a ledge overlooking their encampment, a nice vantage point but one which also means they're on their own if we approach from the air - we used a WASP but there's a Banshee in the base if you can snag it - to take them down easily with vehicle fire.
You can also approach from the hills behind Barroth to drop down on top of them and use more traditional methods for a kill. Once down, grab the Stalker Rifle Ultra from its perch and take out all remaining ground units for a pretty satisfying win.
ORDO' MAL
This one's a showdown with a Wraith and, luckily for us, FOB Hotel is right nearby, meaning we're rocking up to Ordo's joint in a Scorpion.

It turns out it only takes two or three hits to destroy the Wraith involved here but you still need to be a little careful as there are rocket-wielding enemies in the surrounding hills, so roll in slowly picking these off and watching out for two ghosts that will attack from the flanks as well.
Once you've softened the camp up a bit Ordo is a breeze and you'll get a nice Scatterbound Heatwave as a reward.
WRITH KUL
This target has taken refuge on a small plateau marooned high up on the side of a structure. The only way in is by the air, unless you can get really creative, and you need to be aware of a gun emplacement to the east side that can make getting there undamaged quite tricky.
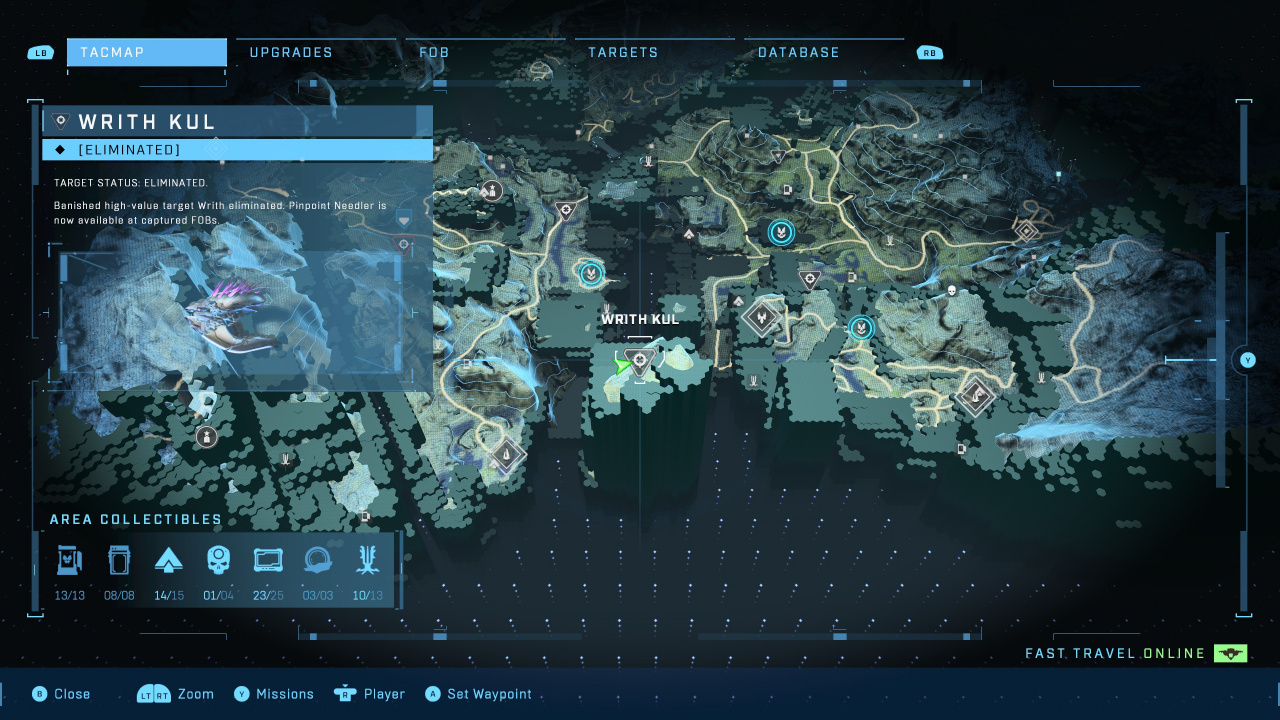
Once you've got your boots on the ground here though, things aren't too difficult, thanks to plenty of heavy duty weapons scattered around, including plasma swords and a gravity hammer.
Writh Kul herself doesn't take much to put down in the end and really it's just a matter of approaching from the air with caution then dropping down, grabbing a heavy weapon, and laying waste to this small camp's inhabitants. You'll get the Pinpoint Needler variant for your troubles.
EN' GEDDON
This target battle is pretty straightforward stuff, save for the fact En' Geddon is heavily armoured and carrying a great big gravity hammer.

With that gravity hammer in mind, it's really best to keep your distance here and, honestly, we found that one shock grenade launched from afar to root him to the spot followed by every other grenade we had at our disposal, finished him off really quickly.
However, if you want to get more tactical, there are lots of vantage points from which to snipe the camp and soften up his band of warriors. There are also a few vehicles laying around, but these are dangerous to use when your foe can take them out in one blow with a hammer.
We reckon our grenade tactic or sniping are the best options here and you'll get a cute Rushdown Hammer for your efforts.
Need more help or tips for Halo Infinite? Check out our Halo Infinite Guides hub!


Comments 0
Wow, no comments yet... why not be the first?
Leave A Comment
Hold on there, you need to login to post a comment...